Adding Voice Control to Your Documents

Last week, we released a blog post where we demonstrated how to make your documents “speak” to you. This made use of the browser’s Web Speech API and our PDF Embed API event support to let users select text and have that browser read that selected text to them. While that’s great and could be really helpful to people struggling with understanding text, let’s flip things around a bit and start talking back to our documents.
Once again, we’ll make use of the Web Speech API, but this time the Speech Recognition API. As you can probably guess, this API is focused on accepting audio input and attempting to recognize what was said. This typically involves a service and as the MDN docs warn us, may not work offline. It’s also crucial to note that there is a huge difference between speech recognition (“what are the literal things the user just said”) versus natural language processing (“what was the intent of what they just said”). NLP is a bit out of scope for this blog post, but if we focus on understanding a few simple commands, it’s possible to add voice control to our documents. Let’s start off with a basic example.
Speech Recognition in JavaScript
As always, we rely on the excellent docs at MDN Web Docs. With that, we can build a simple demo that prompts to enable speech recognition and then simply dumps out what’s heard:

We’ll skip the HTML as it’s minimal but it will be available below. Let’s get right into the JavaScript.
First, we’ll grab a pointer to the core API and create a new instance:
According to the browser compatability table for this feature, the prefix is required in pretty much every browser, although in my testing, it was available unprefixed in Edge. Either way, better safe than sorry.
Now we’ll configure the recognition object:
Continuous means to keep listening, which won’t always be appropriate. The lang flag will help the browser understand what is being said. The interimResults flag set to false basically means, "let me know what was said when they are done talking".
Now we’ll select our button and textarea from the DOM and set up an event listener on the button:
The final bit will handle the rest of the demo:
We turn on recognition and specify an event handler for results. In that handler, we look at the result object and focus on the transcript. To be clear, there’s a lot more data but getting the transcript is enough. You can test out this demo below.
Finally, as you’ll notice if you actually try the code, you get a browser prompt for permissions when enabling recognition. This is a good thing of course, and a better version of our demo would handle the user rejecting that permission.
Speech Recognition and Document Control
Now that we know the very basics, how can we use this to control our documents? PDF Embed has a rich set of APIs that give you control over the embedded PDF.
At a basic level, you are required to ask for an API object from your Embed instance. Here’s a basic example:
Once you have this object, you can then do various things with the document, including changing the current page, zoom, and even performing a search. For our demo, we’re going to support three basic commands:
- previous page (go back one page)
- next page (go to the next page)
- search for “X” (search for something)
Let’s take a look at the code that makes this happen. First, some variable initialization:
Next is the function that renders the PDF. This is fairly boilerplate PDF Embed code, with some differences we’ll point out:
Alright, so one of the first things unique about this is that in our options to previewFile, we have to specifically enable the search API. This API needs to turned on before it can be used via the apis object we create.
The rest of the code configures our recognition object and adds the event listener to our button.
Now let’s look at enableSpeechRecognition:
This is similar to our earlier code with the main difference being now that we take the speech we heard and send it to another function that will actually handle it. Let’s look at that now:
So as the function says, we begin by cleaning it up a bit so our processing can be simpler. Our first two commands, previous and next page, are simple as they just need to use the gotoLocation API. We do check to ensure we don't go below page 1, but we don't need that check on the other side. As an aside, gotoLocation also lets you scroll to an X,Y coordinate, but we don't need that.
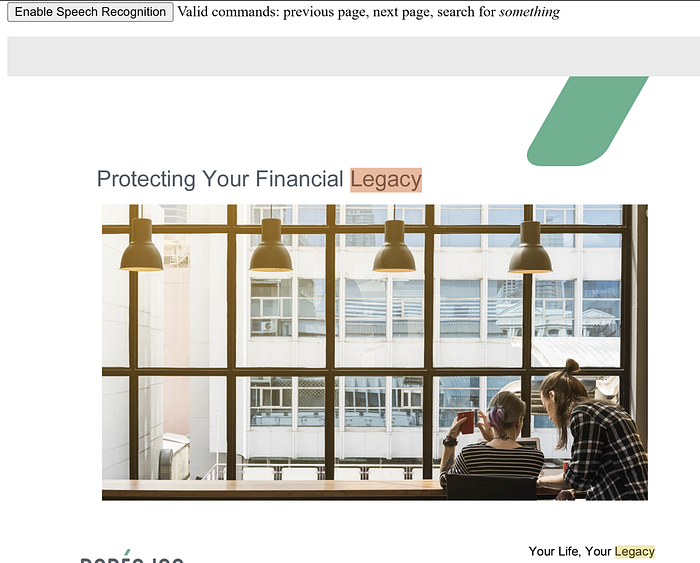
The final portion deals with searches, and for that, we remove the initial part of the command and get to just the term. The search API is fairly simple as you can see. Here's an example of it searching for 'legacy':
You can demo this below, and note how we use a bit of text on top to instruct the user about what to say. This is where a NLP system would really help out as it would translate our text into intents that would be easier to work with.
But Wait — There’s More!
We hope this and the previous article have been a great introduction to how powerful browser APIs can be integrated into your documents with the PDF Embed API. If you’ve got examples like this you would like to share, please leave a comment below!