AEM 6.4 : Creating a Scheduler Using OSGi R6 Annotations

Creating a scheduler in Adobe Experience Manager (AEM) is one of the most common requirements that comes along with every project implementation, and AEM developers are pretty familiar with creating a scheduler using SCR annotations. A scheduler is used to trigger an activity for a particular job, event, or workflow at a set time or periodic interval. But from AEM 6.2 onwards, Felix SCR annotations are deprecated and OSGi R6 annotations are introduced. As these are official annotations from OSGi, it allows access to all future enhancements that OSGi includes in their coming releases.
Here’s how to create a scheduler with OSGi R6 annotations.
Prerequisite:
- maven-bundle-plugin version 3.2.0 or greater has been included in pom.xml
<plugin>
                    <groupId>org.apache.felix</groupId>
                    <artifactId>maven-bundle-plugin</artifactId>
                    <version>3.3.0</version>
                </plugin>
2. Added dependency for org.osgi.service.component.annotations.* and org.osgi.service.metatype.annotations.*
<dependency>
                <groupId>org.osgi</groupId>
                <artifactId>osgi.annotation</artifactId>
                <version>6.0.0</version>
                <scope>provided</scope>
            </dependency>
            <dependency>
                <groupId>org.osgi</groupId>                <artifactId>org.osgi.service.component.annotations</artifactId>
                <version>1.3.0</version>
                <scope>provided</scope>
            </dependency>
            <dependency>
                <groupId>org.osgi</groupId>
                <artifactId>org.osgi.service.metatype.annotations</artifactId>
                <version>1.3.0</version>
                <scope>provided</scope>
            </dependency>
Creating your scheduler OSGi R6 configurations interface:
Unlike with SCR annotations, it is very clean and simple to create OSGi configurations using R6 annotations by simply using @AttributeDefinition. Use the below code snippet to create an OSGi R6 configurations interface for scheduler.
package com.learning.schedulers.interfaces;import org.osgi.service.metatype.annotations.AttributeDefinition;
import org.osgi.service.metatype.annotations.AttributeType;
import org.osgi.service.metatype.annotations.ObjectClassDefinition;/**
 * Configuration file for OSGIR6SchedulerExample
 *
 * @author aahlawa
 *
 */
@ObjectClassDefinition(name = "OSGi R6 Scheduler Configuration Example", description = "OSGi R6 Scheduler Configuration Example")
public @interface OSGIR6SchedulerExampleConfiguration {
/**
 * schedulerName
 * @return String name
 */
 @AttributeDefinition(name = "Scheduler name", description = "Scheduler name", type = AttributeType.STRING)
 public String schedulerName() default "OSGi R6 Annotation Scheduler Example";
/**
 * schedulerConcurrent
 * @return schedulerConcurrent
 */
 @AttributeDefinition(name = "Concurrent", description = "Schedule task concurrently", type = AttributeType.BOOLEAN)
 boolean schedulerConcurrent() default true;
/**
 * serviceEnabled
 * @return serviceEnabled
 */
 @AttributeDefinition(name = "Enabled", description = "Enable Scheduler", type = AttributeType.BOOLEAN)
 boolean serviceEnabled() default true;
/**
 * schedulerExpression
 * @return schedulerExpression
 */
 @AttributeDefinition(name = "Expression", description = "Cron-job expression. Default: run every hour.", type = AttributeType.STRING)
 String schedulerExpression() default "0 0 0/1 1/1 * ? *";}
Now let’s create a scheduler in AEM.
Creating a scheduler in AEM 6.4:
I have seen many AEM developers code. Usually they create the scheduler but forget to remove it once its configuration is modified or deleted. In the below code snippet, I have taken a variable schedulerID to remove the previously scheduled scheduler. This greatly increases the performance of your server.
package com.learning.schedulers;import org.apache.sling.commons.scheduler.ScheduleOptions;
import org.apache.sling.commons.scheduler.Scheduler;
import org.osgi.service.component.annotations.Activate;
import org.osgi.service.component.annotations.Component;
import org.osgi.service.component.annotations.Deactivate;
import org.osgi.service.component.annotations.Modified;
import org.osgi.service.component.annotations.Reference;
import org.osgi.service.metatype.annotations.Designate;
import org.slf4j.Logger;
import org.slf4j.LoggerFactory;import com.learning.scheduler.interfaces.OSGIR6SchedulerExampleConfiguration;/**
 * OSGI R6 Annotation Scheduler Example
 *
 * @author aahlawat
 *
 */
@Component(immediate = true, service = OSGIR6SchedulerExample.class)
@Designate(ocd = OSGIR6SchedulerExampleConfiguration.class)
public class OSGIR6SchedulerExample implements Runnable {@Reference
 private Scheduler scheduler;private int schedulerID;private final Logger logger = LoggerFactory.getLogger(this.getClass());@Activate
 protected void activate(OSGIR6SchedulerExampleConfiguration config) {
  schedulerID = config.schedulerName().hashCode();
 }@Modified
 protected void modified(OSGIR6SchedulerExampleConfiguration config) {
  removeScheduler();
  schedulerID = config.schedulerName().hashCode(); // update schedulerID
  addScheduler(config);
 }@Deactivate
 protected void deactivate(OSGIR6SchedulerExampleConfiguration config) {
  removeScheduler();
 }/**
  * Remove a scheduler based on the scheduler ID
  */
 private void removeScheduler() {
  logger.debug("Removing Scheduler Job '{}'", schedulerID);
  scheduler.unschedule(String.valueOf(schedulerID));
 }/**
  * Add a scheduler based on the scheduler ID
  */
 private void addScheduler(OSGIR6SchedulerExampleConfiguration config) {
  if (config.serviceEnabled()) {
   ScheduleOptions sopts = scheduler.EXPR(config.schedulerExpression());
   sopts.name(String.valueOf(schedulerID));
   sopts.canRunConcurrently(false);
   scheduler.schedule(this, sopts);
   logger.debug("Scheduler added succesfully");
  } else {
   logger.debug("OSGIR6SchedulerExample is Disabled, no scheduler job created");
  }
 }@Override
 public void run() {
  logger.debug("Inside OSGIR6SchedulerExample run Method");
 }
}
Testing your scheduler:
Follow the below steps to test your scheduler.
- Deploy you code to the respective AEM instance.
- Navigate to Felix console configurations (http://localhost:4502/system/console/configMgr).
- Press Ctrl + F and Search for your scheduler. In our case search for “OSGi R6 Scheduler Configuration Example” as shown in the below screenshot.
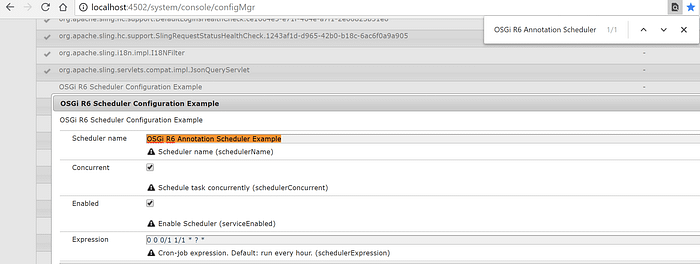
4. Check the log file to see debug logs “Inside OSGiR6SchedulerExample run Method.”
Hope you learned something new today. If you have any questions or trouble, feel free to drop a comment.