How to Fix CORS Errors in Your Adobe Express Add-on
If you just built your first Adobe Express add-on and wired it up to a backend API, there’s a decent chance you’ve already hit this wall. Everything works perfectly when you test your server with Postman or curl, but the moment your add-on calls it from the browser, you may see errors like these:
CORS Policy Issue : ‘Response to preflight request doesn’t pass access control check: It does not have HTTP ok status’
Access to fetch at ‘https://api.example.com/data' from origin ‘http://localhost:3000' has been blocked by CORS policy: No ‘Access-Control-Allow-Origin’ header is present on the requested resource.
Cross-Origin Request Blocked: The Same Origin Policy disallows reading the remote resource at https://api.example.com/data.
Request header field authorization is not allowed by Access-Control-Allow-Headers in preflight response.
This post walks you through exactly what CORS is, why it only shows up in the browser, and how to fix it at each stage: local development, a private link, and finally a public listing. I’ll also cover why you need a separate backend in the first place, because that part trips up a lot of people before they even get to the CORS problem.
How to Fix CORS at Each Stage
If you just want to fix the error, start with the sections below.
If you want to understand what CORS actually is, why it occurs, and how Adobe Express add-ons connect to a backend, then keep reading till the end.
Stage 1: Local Development
When you’re developing on your own computer, both the add-on and your backend are running locally. You want to move fast and not get bogged down in configuration. The simplest approach is to allow all origins with a wildcard:
Access-Control-Allow-Origin: *
This tells the browser: any webpage’s JavaScript is allowed to read responses from this server. It’s a wide-open policy, and that’s fine while you’re learning and building. Just don’t use it once real users are involved.
First, install the cors package for Express:
npm install cors
Then add it to your server:
const express = require("express");
const cors = require("cors");
const app = express();
app.use(cors({ origin: "*" }));
app.use(express.json());
app.post("/api/hello", (req, res) => {
 res.json({ ok: true });
});
app.listen(3000, () => {
 console.log("Server running on port 3000");
});
That’s really all you need for local development. Test in Chrome DevTools → Network tab to confirm it’s working from the browser.
Stage 2: Private Listing
(If you’re not sure how to set up a private/public listing, just watch this video I made, which shows you exactly how.)
When you create a private listing, your add-on is packaged and hosted by Adobe, not by your local machine. You share a link with teammates or your friends, they open Adobe Express with that link, and your add-on UI loads from Adobe’s servers.
This means fetch() requests now come from a different origin. Instead of https://localhost:5241, it’s now something like:
https://abc123.wxp.adobe-addons.com
So even though your backend URL did not change, the browser now sees the request as coming from a different origin.
If your server still only allows localhost, the request gets blocked by CORS.
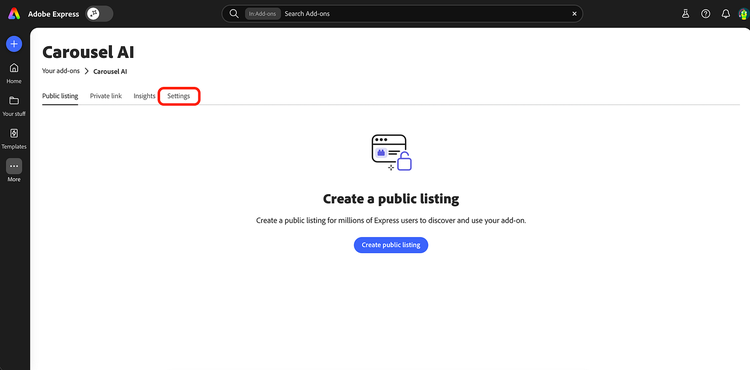
How to find your Add-on URL:
- Open Adobe Express.
Press enter or click to view image in full size
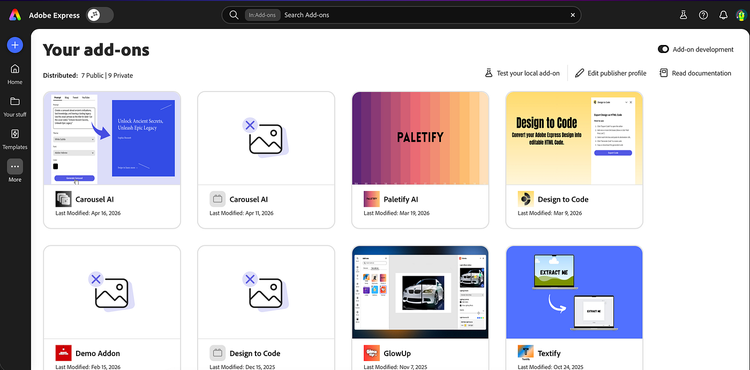
2. Go to Your Add-ons → select your add-on.
3. Click the Settings tab.
Press enter or click to view image in full size
4. Under Add-on URL, click Copy. It’ll look like https://abc123.wxp.adobe-addons.com/.
Press enter or click to view image in full size
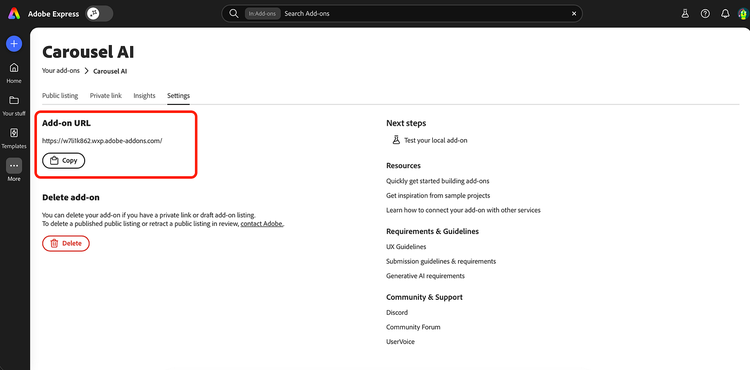
Use that origin in your server’s CORS config (without the trailing slash):
const express = require("express");
const cors = require("cors");
const app = express();
const allowedOrigins = [
 "https://abc123.wxp.adobe-addons.com", // from Settings → Add-on URL
 "https://localhost:5241",              // your local dev port
];
app.use(
 cors({
   origin(origin, cb) {
     // Allow requests with the defined origins only
     if (!origin || allowedOrigins.includes(origin)) return cb(null, true);
     return cb(null, false);
   },
   methods: ["GET", "POST", "PUT", "PATCH", "DELETE", "OPTIONS"],
   allowedHeaders: ["Content-Type", "Authorization", "X-Requested-With"],
   maxAge: 86400, // cache preflight response for 24 hours
 })
);
app.use(express.json());
The Add-on URL is stable; it doesn’t change between your private link and your public listing. So once you’ve added it here, you’re set for both.
Stage 3: Public Listing
For a public listing, your add-on goes through Adobe’s review process and becomes discoverable in the Adobe Express marketplace. Real users can find and install it.
From a CORS standpoint, nothing changes about the origin. Your add-on UI still loads from the same https://abc123.wxp.adobe-addons.com origin. The CORS config you set up for the private listing still works.
What does change is everything around it:
- Your backend needs to be hosted on the cloud:
http://localhost:3000works when you're testing yourself, but reviewers and real users can't reach your laptop. You'll need to deploy your backend somewhere: AWS, Render, Railway, Vercel, Fly.io, etc. - Prefer explicit origins over
*. Once real users are involved, you don't want random other websites to be able to call your backend. Lock it down to your Add-on URL and any other origins you actually control. - Never ship API keys in the add-on bundle. In production, secrets live on your server in environment variables (a
.envfile or your hosting provider's secret management), not in your add-on code.
If You are Still Stuck? Here’s How to Debug
Open Chrome DevTools → Network tab. Look for a request with a method OPTIONS. That's the preflight. Check:
- Did it get a 2xx status? If it got 401, 403, or 404, your auth middleware is running before CORS. Move
app.use(cors(...))to the very top of your server, before anything else. - Does the response have
Access-Control-Allow-Origin,Access-Control-Allow-Methods, andAccess-Control-Allow-Headers? If those headers are missing, your CORS setup isn't running.
Once the OPTIONS request looks clean, check the actual POST/GET request right after it. By that point, it should work.
At this point, your add-on should be working correctly.
But if you’re wondering why the browser blocks these requests in the first place, or what terms like “preflight”, “origin”, and “Access-Control-Allow-Origin” actually mean, let’s break down CORS in detail.
What is CORS, Really?
CORS stands for Cross-Origin Resource Sharing. It’s a security rule built into every browser.
Here’s the situation it’s designed for: imagine you’re logged into Gmail and then visit a shady forum. JavaScript on that forum tries to silently fetch your inbox data by making requests to Google’s servers on your behalf (using your login cookies).
Without CORS, the shady site could read your emails. With CORS, Google’s servers send headers saying “Only gmail.com can read this.” Your browser blocks shadyforum.com from accessing the response, keeping your data safe.
The way a server signals “yes, I allow this” is by including specific HTTP response headers, headers that start with Access-Control-.... If those headers are missing, or if they don't match the origin of the page making the request, the browser blocks the response. Your JavaScript never sees the data, and you get a CORS error in the console.
Two things to keep in mind:
One: curl and Postman calls don’t go through this check. CORS is a browser thing. So when your terminal says the API works fine, it’s not lying; it’s just not going through the same rule. Your add-on in the browser is a completely different story.
Two: CORS errors don’t mean your server is broken. It means your server is running fine, but isn’t sending the right permission headers back. The fix is almost always adding a few lines to your server code and not your add-on code.
Why Do You Even Need a Separate Backend/Server?
When you build an Adobe Express add-on, the UI part, the panel with your buttons, forms, and JavaScript, all run inside the user’s browser. That means every line of code you write there can be opened, read, and copied by anyone who knows where to look. Browser DevTools makes this trivially easy.
So here’s the problem: What if your add-on needs to call OpenAI? Or talk to a database? Or make a payment? Those operations need secret keys, API keys, database passwords, and tokens. If you put those keys inside your add-on code, they ship to the browser, and they’re exposed. Anyone can steal them.
A backend server solves this. It’s a completely separate program, a separate folder on your computer, running its own process, that sits between your add-on and the outside world. Your add-on sends a request to your backend, your backend uses the secret keys to call OpenAI or your database, and then it sends the result back to your add-on. The keys never touch the browser.
Here’s what that separation looks like in practice:
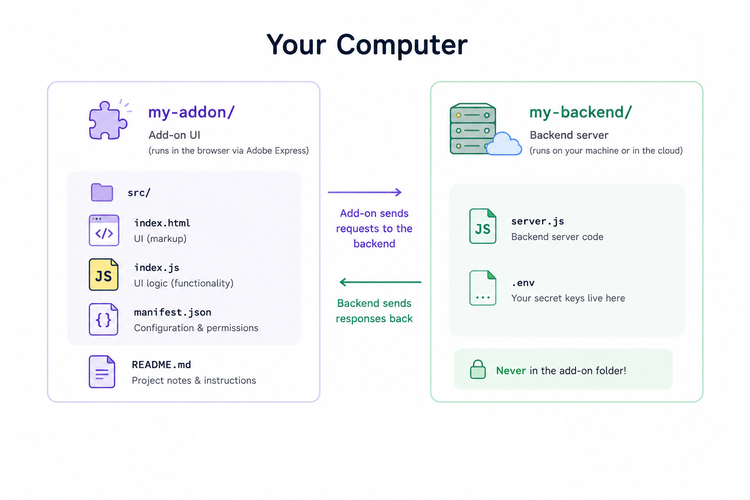
These are two separate projects. You run them with two separate commands. The add-on calls the backend over HTTP using fetch(), and the backend does the sensitive work and returns JSON.
How the Add-On and Backend Actually Connect
Let’s trace exactly what happens when your add-on calls your backend, step by step:
- A user opens Adobe Express, and your add-on panel loads in their browser.
- The user clicks a button or triggers some action, and your JavaScript runs
fetch("https://your-api.com/something", { method: "POST", ... }). - The browser sends that HTTP request to your backend server.
- Your server processes the request and sends back a response, some JSON probably, along with a set of HTTP headers.
- The browser looks at those headers. If
Access-Control-Allow-Originis present and matches the origin of the page that made the call, the browser passes the response to your JavaScript. If it's missing or wrong, the browser throws a CORS error, and your code gets nothing.
So the add-on is the client, your server is the backend, and they talk over HTTP. CORS lives at step 5, on the browser side, checking what the server said.
One important thing about where to put your fetch() calls: In the Adobe Express add-on architecture, there are two environments, the panel UI (your index.js/App.js, the HTML/JS that renders the interface) and the document sandbox (your code.js, which handles logic related to the Express document itself).
Network calls like fetch() belong in the panel UI, not the document sandbox. The sandbox is for document operations; the UI is where normal web networking happens.
Why Do CORS Errors Occur?
There are a few common reasons, and knowing which one you’re hitting makes fixing it much faster.
- Your server doesn’t send the header at all: This is the most common one. The server returns JSON with a 200 status, but it never includes
Access-Control-Allow-Origin. The browser rejects it. - The origin doesn’t match: During local development, your add-on UI might be coming from
https://localhost:5241. Once you create a private or public listing, it comes from something likehttps://abc123.wxp.adobe-addons.com. If your server is still only set to allowlocalhost, the hosted version of your add-on will get blocked. - The preflight (OPTIONS) request fails: For certain types of requests, like a
POSTwith aContent-Type: application/jsonheader, or requests with aAuthorizationheader, the browser doesn't just send your request. It first sends a small "permission check" request using theOPTIONSmethod. Your server needs to respond to that OPTIONS request with a 200 or 204 and the right headers. If your server returns a 401 or 403 for OPTIONS, the real request never even gets sent. You'll see the word "preflight" in the error message when this is the issue.
In Express.js, thecorspackage usually handles preflight requests automatically when configured correctly. Most preflight issues happen because:
• CORS middleware is added after the auth middleware
• Custom middleware blocks OPTIONS - Credentials with a wildcard. If you use
fetch(url, { credentials: 'include' })to send cookies cross-origin, the browser won't acceptAccess-Control-Allow-Origin: *. You have to specify the exact origin and also sendAccess-Control-Allow-Credentials: true.
That said, most add-ons use a Bearer token in aAuthorizationheader instead of cookies, and don't run into this.
Common Questions
- Does my backend have to be separate?
Yes, it’s a completely separate project with its ownpackage.json(if you're using Node.js), its own dependencies, and its own startup command. You run it separately from your add-on. Think of them as two different apps that happen to talk to each other. - Why can’t I just put everything in the add-on?
Because the add-on runs in the browser, and the browser code is fully visible to anyone who opens DevTools. API keys, database credentials, and business logic that shouldn’t be inspectable or copyable belong on a server where users can’t see them. - Is the CORS config different for a private listing vs a public listing?
Not for the origin string, it’s the sameAdd-on URLin both cases. The difference is that for a public listing, your backend has to be deployed somewhere real users can reach it over HTTPS. - Why does OPTIONS show up in my Network tab?
The browser sends an OPTIONS preflight automatically before certain types of cross-origin requests (like a POST with a JSON body or an Authorization header). It’s the browser asking your server, “What are you going to allow?” before committing to the real request. Your server needs to respond to it correctly. - Must I use Node.js + Express for the backend?
No. You can use any backend stack or service: Express, FastAPI, Flask, Django, Next.js APIs, AWS Lambda, Firebase Functions, Cloudflare Workers, or anything else.
CORS is not tied to Express or Node.js. It’s just about your backend returning the correctAccess-Control-*headers.
Different frameworks configure CORS differently: - Express uses the
corsmiddleware - FastAPI uses
CORSMiddleware - Flask uses
flask-cors - AWS Lambda usually configures CORS in API Gateway or response headers
- Cloudflare Workers manually return CORS headers in the response
But the core idea is always the same:
Your backend must allow requests coming from your Adobe Express add-on origin.
Wrapping Up
CORS errors feel like they come from the add-on because that’s where the red console text appears. But you’re actually looking at a browser safety rule that sits between two separate programs, your add-on UI and your backend API. Once you understand that separation, the fix is pretty straightforward: configure your server to send the right response headers for wherever your add-on is currently being served from.
When things break, the browser’s Network tab usually tells you what’s wrong. Check OPTIONS first, then your actual request. The headers will tell you exactly what’s missing.
Further reading: Iframe Runtime Context & Security · Add-on Architecture · Private Distribution · Public Distribution
If you’re still facing some problem, you can reach out to me directly on Twitter and LinkedIn. I’m always happy to help fellow developers in the Express ecosystem.
Thank you for your attention to this matter. See you in the next one :)