Build Your Own Commerce Storefront Block
The new Adobe Commerce Storefront is meant to be extended, not just configured. This post walks through building your own commerce block at three levels of abstraction: writing your own GraphQL query for full control, calling a drop-in's API to skip the boilerplate, or reusing the drop-in UI components for a consistent look. “Product Compare”, built from two small blocks, ties them together and shows why you're never blocked from shipping what you need.
In 2024 we released a new Adobe Commerce Storefront. If you're coming from classic monolithic Magento, the instinct is to evaluate it the same way. You look for the official stamp that guarantees best practices and long-term support for everything you add. You expect to install a module for every piece of functionality, layout XML, template overrides, and a build-and-deploy cycle just to see a result. You expect content and commerce logic tightly coupled, such that a change in one impacts the other.
That guarantee of best practices and long-term support still exists, but it has moved: Adobe Commerce's microservices, APIs, and Drop-in components now carry it, not the front-end code you write. The front-end layer is meant to be extended and customized by whoever is building the storefront.
The Storefront is powered by Edge Delivery Services and Adobe Commerce Drop-ins, promising simplicity, composability and separation of functionality and styling. I’d argue it makes your code disposable in the best way: a block is a small, self-contained decorator, so rewriting one is usually cheaper than nursing it along. Start again, redo it, move on.
The Storefront calls for a different mindset: composable code grounded in Edge Delivery Services' best practices. That means performance by default, not an afterthought. Primitives simple enough for an AI agent to reason about, and Drop-ins that let you compose tested commerce workflows rather than writing them from scratch.
To illustrate this point, I added a fully functional Product Compare feature to a Storefront. I designed the feature, then had AI generate the implementation from that plan. It required only two new blocks, both implemented with client-side JavaScript and CSS decoration, while maintaining a strong Lighthouse score.
What I built
Product Compare: mark a few products, then view them side by side. In this build, there are two main components or blocks.
Product Compare Block
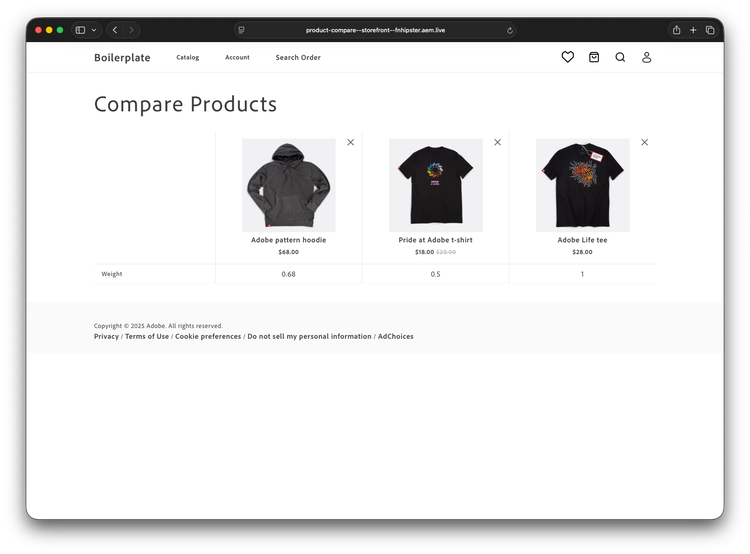
product-compare renders the comparison. It reads a list of SKUs and displays them in a table.
Product Compare Bar Block
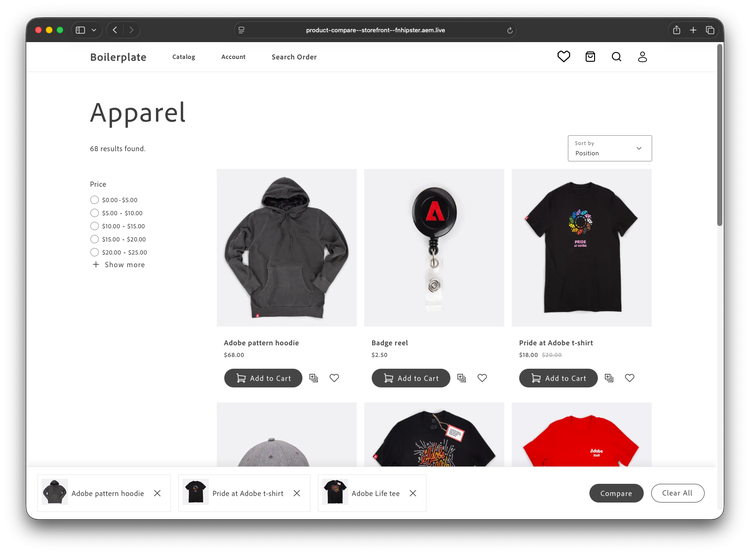
product-compare-bar is a fixed bar that authors can drop on any page. It collects the products a shopper flags and links them to the compare page. I could have wired this directly into the product listing block, but I intentionally split it into its own event-driven block. This makes the event contract explicit rather than buried in product listing logic, and it means the same bar works anywhere products are flagged for comparison, not just on a product listing. Search results, a product carousel, and any place where a shopper can select a product can all emit the same event and add to the same bar.
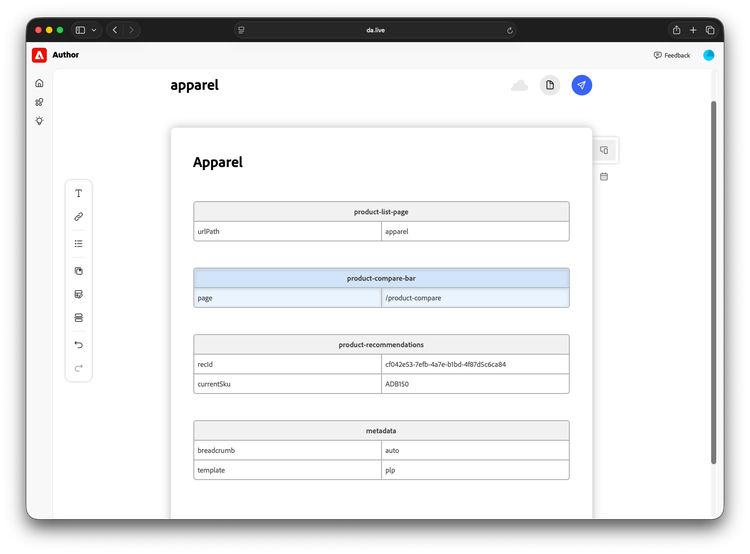
Both are authored blocks, so they appear only where an author places them. You add one by dropping it into a document in the authoring tool. No code change, no deployment. Nothing renders the feature until that table exists, following the same model as every other block on the Storefront.
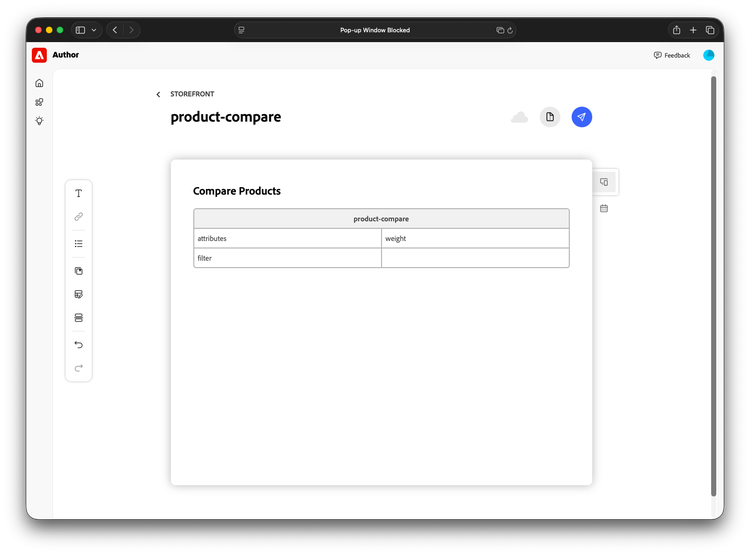
To keep things simple, I decided to store the selection state in the URL of the compare page, the page that references the product-compare block, as ?compare=SKU1,SKU2,SKU3. The bar builds that link from a shopper's selections, and the compare page reads it on load to render the table. For this feature that worked out well: no localStorage to sync, no server-side session to manage, and the page is shareable and bookmarkable for free.
Try it yourself: https://product-compare–-storefront-–fnhipster.aem.live/apparel
Blocks and Drop-ins: what you're actually building
Before discussing the blocks themselves, it's worth clarifying what a block is and how it differs from a Drop-in, because the two solve different problems.
- A block is a unit of UI you own. It's a folder with a JavaScript file and a CSS file that decorates the semantic HTML Edge Delivery Services rendered from an authored document. You write it, you ship it on your own timeline, and you own its lifecycle. Product Compare is a block.
- A Drop-in is a packaged commerce library built and maintained by Adobe, including cart, checkout, product discovery, and more. Each Drop-in has a documented API and its own release cycle. You integrate a Drop-in into your blocks and use its API and components to reuse tested, Adobe-maintained commerce logic rather than building and securing it yourself. You don't own or fork it, but you can customize and more importantly, extend it.
A block in Edge Delivery Services is about as small as a unit of code can be. An author uses a block by adding a table to a document, which maps to a folder containing a matching JavaScript file and a CSS file.
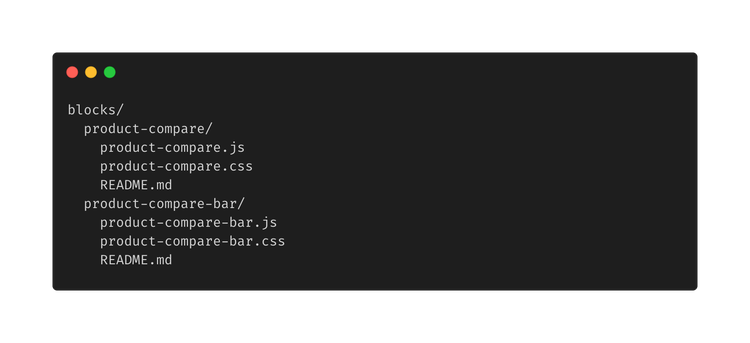
Edge Delivery Services generates the document as plain, semantic HTML that a search crawler or an AI agent can read without executing a single line of JavaScript. In your browser, the JavaScript decorates that HTML, turning static markup into the interactive interface a shopper uses. Document-authoring lets you define the content-to-code contract yourself through authoring conventions. The table an author writes in the document is the contract: it maps directly to the block's markup, as described in the AEM blocks documentation. You decide what an author can configure and what your code renders.
The practical split: build a block for the storefront-specific feature you want, and rely on drop-ins for the tested commerce logic beneath it. Product Compare is a block that consumes the product-discovery drop-in, not a drop-in of its own.
That raises two questions to answer before writing any code.
Is the data I need already exposed by an API? The Storefront communicates with Adobe Commerce as a Cloud Service (ACCS) or Adobe Commerce Optimizer (ACO) via GraphQL. Check the ACCS GraphQL schema for the fields your feature needs. If a drop-in already surfaces that data, you are done before you start.
What if the coverage isn't there? You have an escape hatch at every level:
- A Drop-in's API is available, but its payload is missing a field you need: extend the drop-in's data payload.
- No Drop-in exposes it, but the field is in the schema: write your own GraphQL query and send it through the shared fetch instance (Level 0, below).
- The schema itself is missing the field: extend it. Adobe Commerce as a Cloud Service exposes APIs, and the GraphQL schema can be extended with App Builder.
Because of these options, you are never blocked. The rest of this post walks through the three levels of abstraction you can build with, from writing your own query to composing drop-in APIs and components.
Levels of abstraction
The same feature can be built at three levels of abstraction. Start at the bottom, and you own everything. Move up, and you trade that ownership for tested, consistent artifacts you can reuse. You can freely mix them within a single block.
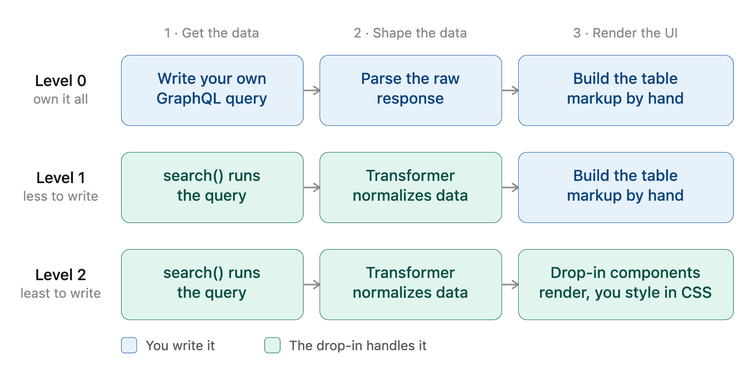
Level 0: Fetch your own data
At the lowest level, a block is just JavaScript, so nothing prevents you from calling the GraphQL API directly. Product Compare needs only a handful of fields per product: enough to build the link, display the image, format the price, and fill the attribute rows. It fetches by SKU, which the API expresses as a sku filter. That keeps the query small.
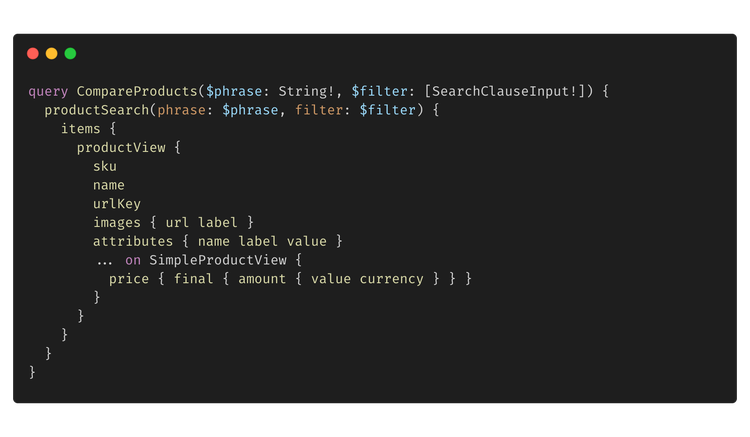
You could send it with the browser's fetch:
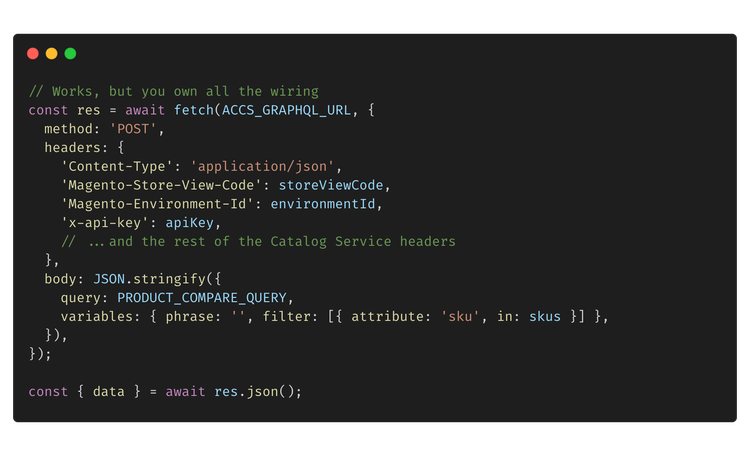
For catalog queries like this one, use the shared CS_FETCH_GRAPHQL instance from scripts/commerce.js. It is configured once at startup with everything a catalog request needs: store context, Catalog Service headers, the shopper's authentication token, and the customer group that drives group-specific pricing. Every catalog query reuses that configuration, so results come back correctly scoped and priced without you having to manage any of it.
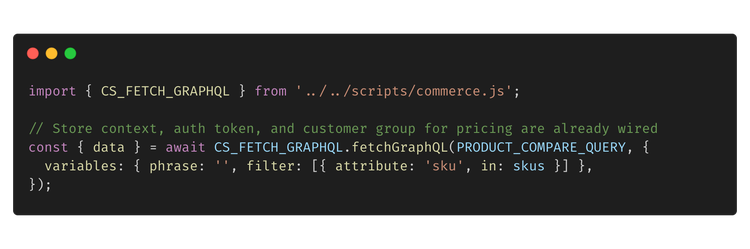
By using CS_FETCH_GRAPHQL, you still write and send your own query, but you don't re-implement all that wiring or the cache-busting it already handles. What you do own is the raw response shape: results come back nested under items[].productView, with prices split across SimpleProductView and ComplexProductView. This is the level you drop to when the higher-level APIs don't cover your case.
Level 1: Let a drop-in API do the fetching
Most of the time, you don't need a handwritten query. The Product Discovery drop-in already exposes a search function that the product listing itself uses (see product-list-page.js). You call it with a phrase, filters, and a page size, and get products back:
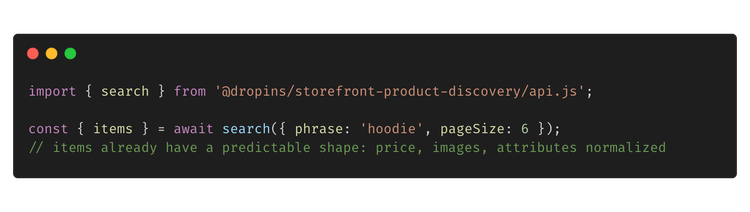
Two things you get for free here that Level 0 leaves to you:
- No query to write or maintain. The drop-in owns the GraphQL, its variables, and its versioning. When the backend query shape changes, that is the drop-in's problem, not yours.
- Data sanitation from the transformer. The drop-in runs every raw response through a transformer before returning it, so instead of the raw
items[].productViewnesting with separate Simple and Complex price shapes, you get products in a stable, predictable form. Your block never parses raw GraphQL, and never breaks because a field returned null in an unexpected place.
Because it uses the same API the product listing and product detail pages already use, behavior like filtering and paging stays consistent with the rest of the storefront. For something this simple, a custom query would have been easy too. The advantage grows with complexity: on a feature built on cart, checkout, or other Drop-in APIs, reusing those functions instead of reimplementing the logic yourself is where the real productivity difference shows.
Level 2: Reuse the Drop-in components
The last level is UI. The drop-ins ship the same visual components they use internally, exported from @dropins/tools/components.js and rendered through a provider. Instead of restyling pricing or re-optimizing images by hand, you render the real thing into your own markup:
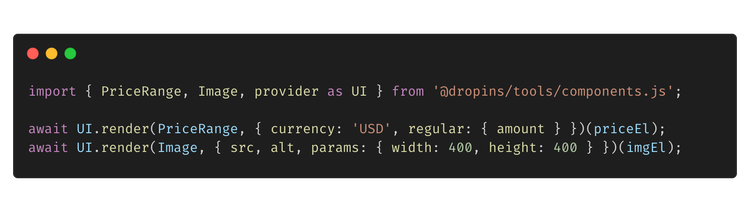
What you get:
- Consistency. Components inherit the storefront's design tokens, so your block matches the rest of the site without you having to copy styles.
- Correctness you would otherwise re-solve. PriceRange handles currency and locale formatting, sale vs. regular price display, and range calculations. Image produces AEM Assets-optimized URLs and lazy loading.
- Accessibility baked into the components rather than bolted on later.
See the UI components overview for the full set.
Product Compare, level by level
In my Product Compare example, I never write a raw query because the search API (Level 1) returns the products I need. I also never format prices or images by hand because I reuse the drop-in components (Level 2). What's left is the logic specific to the feature: reading the selected SKUs, rendering the comparison table, and allowing shoppers to add or remove products.
product-compare reads the ?compare= SKUs on load, fetches data via the search API, and renders a table using the drop-in components. A built-in search field lets a shopper add more products directly on the page, up to MAX_PRODUCTS columns. Removing a product updates both the table and the URL.
It also reads author-configured options directly from the block, so no separate settings UI is needed:
attributeskeep the table from becoming an unreadable wall of every custom attribute a catalog happens to have.filterprevents a shopper from comparing, say, a lens against a tripod by scoping which products are eligible in the first place.
The table doesn't try to guess a common set of attributes. It renders every attribute the compared products expose, in one of two modes. If an author lists attributes on the block, only those show, in that order. Otherwise, the table takes the union across all products and drops any row where none of the products has a value.
The filter row determines which products can be included in a comparison. An author sets it once on the block, for example, product_type:camera or a merchant flag like comparable:1 , and it applies to both entry points: the SKUs read from the URL and the add-more search field. Because both paths apply to it, a shopper can't slip an ineligible product in by editing the URL, so a lens never appears next to a tripod.
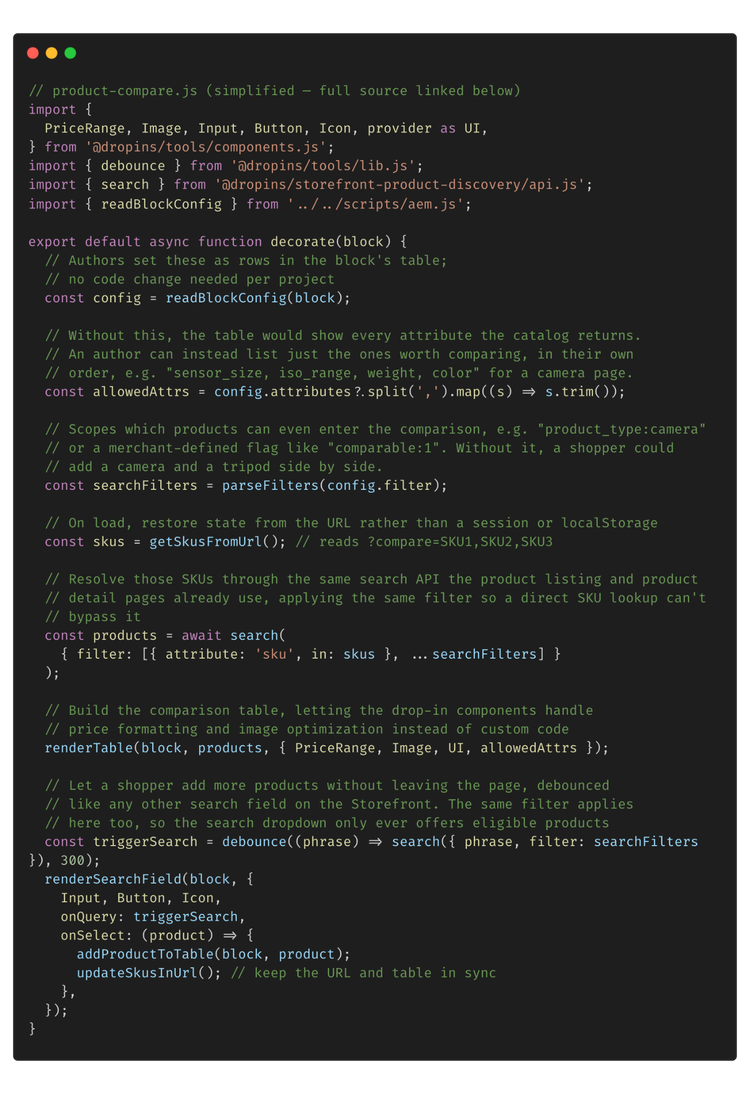
View full source code: product-compare.js
The next two blocks coordinate via the drop-ins' Event Bus, a shared publish-and-subscribe channel. One block emits a named event, and any others listening for it respond. Neither holds a reference to the other. Drop-ins also broadcast their own events this way, such as cart and sign-in changes, making it the storefront's default way to respond to activity elsewhere. The Event Bus reference documents the API and the events drop-ins publish.
product-compare-bar is a fixed bar that tracks a shopper's selections in memory. It doesn't fetch anything on its own; it listens for a compare/products event, adds or removes the given SKU, and re-renders. When the shopper clicks Compare, it builds the ?compare=SKU1,SKU2,SKU3 link that product-compare reads.
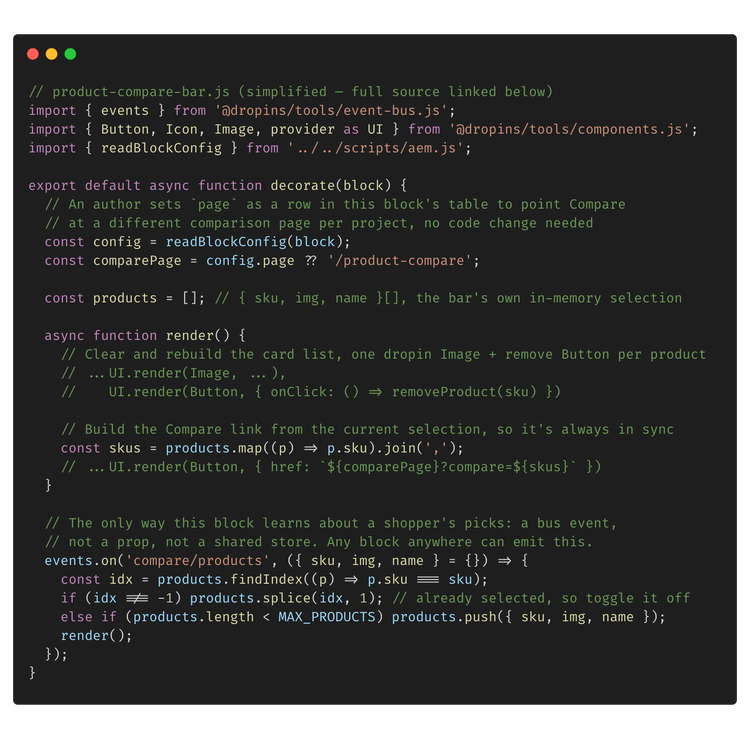
View full source code: product-compare-bar.js
The other half of that event is on the product listing itself. product-list-page renders search results via the product-discovery drop-in and hooks a Compare button into its ProductActions slot, the same extension point used for the Add to Cart and Wishlist buttons already on that card:
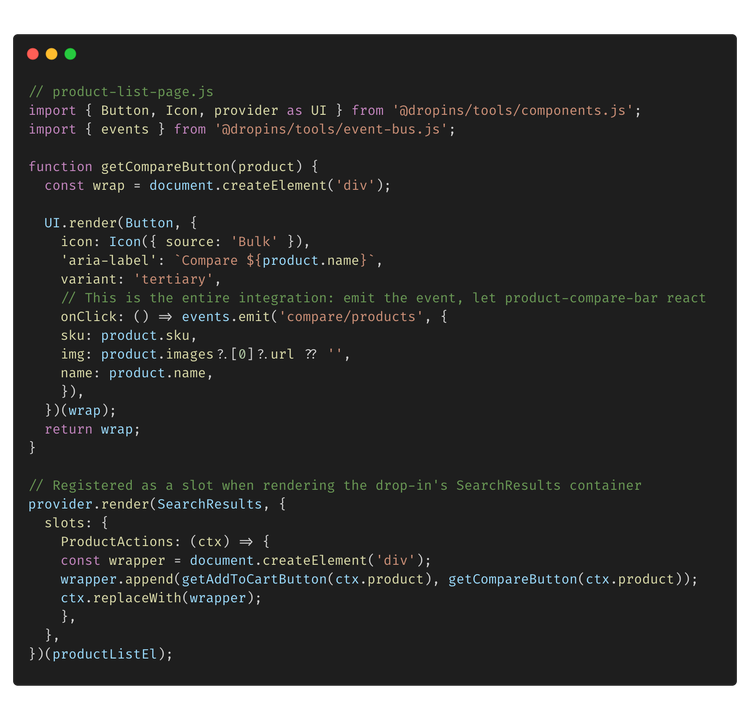
View full source code: product-list-page.js
Neither block needs to know the other exists. You're free to shape the feature; the Drop-ins handle the commerce logic for you.
That's what makes it composable, not just decoupled. The same feature drops into any document by adding a Product Compare or Product Compare Bar table. Placement is an authoring decision, not a code change.
Plan it, then let AI do the rest
The AI work here didn't start with a prompt. It started with the same thing every feature does: understanding what Product Compare needed to be, what the table should show, how an author would configure it, what state had to survive a page reload, and what I could reuse instead of writing from scratch. That's a design pass, deciding on the architecture and the author-facing shape of the feature, before any code exists. It is also where the level split above gets decided: which parts lean on a Drop-in API, which reuse drop-in components, and whether anything has to drop to a raw query.
Once that plan was clear, the Boilerplate skills made the AI actually useful for the rest of the work. This is also how a developer new to Edge Delivery Services discovers the good decisions in this post without having to already know them: the skills encode the project's real conventions and let an agent look up the actual slot names, event payloads, and component props from the Drop-in TypeScript definitions instead of inventing new conventions in your project. Handing an agent a clear plan with the context the Storefront skills provide lets it generate the code, quick and cheap enough to A/B test, improve, or even throw away later.
The takeaway
Merchants shouldn't have to wait for new Storefront features to ship, and in many cases, they don't. That's by design. Chances are, the use case is already supported by Adobe Commerce as a Cloud Service API, or the GraphQL schema can be extended with App Builder. Either way, the Storefront is built from reusable artifacts, blocks, and drop-ins that let you build the user interface quickly and with fewer dependencies. Understanding how Commerce Blocks and Drop-ins fit together enables you to build custom frontend features this fast.
If you want to see the actual code, the Product Compare work is in this pull request. Create your own storefront project, build a block of your own, and tell us how it went in Discord.