How to Work with The Adobe Photoshop APIs

We recently introduced you to the Adobe Photoshop APIs. In our previous article, we covered what the APIs are at a high level and gave a rundown of the features available. In this post, we’ll now actually give you an example of working with the API. While this blog post will use Node, the REST-based APIs provided can be used on any platform.
Prerequisites
Working with the Photoshop APIs requires two main things. First, you need to sign up and get your credentials.
You will first be asked to create a project. You can rename the generated project to something more sensible if you wish.

After successfully creating the project, your browser will download a file, config.zip, that contains a public certificate and private key. You'll also be shown a screen with your client ID:

In order to work with the API however, we’ll need a bit more. Clicking the “Console” button in the upper right corner of the page will take you to the Adobe Developer console. Find your newly created project there and click on Credentials in the left-hand nav. On this page you’ll find your client id, client secret, technical account id, technical account email, and organization ID. All of these values are needed and will be used in our code in a bit, so keep them handy.

Note that the developer console lets you generate an access token that’s valid for 24 hours. While that’s acceptable for quick testing, the demo we’ll build in this post will be able to generate the token dynamically.
Now that you have credentials, you need to figure out where you store both your input and outputs. The Photoshop APIs support three cloud storage providers:
- AWS S3
- Azure Blob Storage
- Dropbox
Signing up for and provisioning these providers is outside the scope of this article, but the docs provide some basic guidance on what’s required from each. For the purpose of this article, we’ll be using a SAS (Shared Access Signature) for Microsoft’s Azure storage service. We will specify both a root domain and the SAS as credential information that we’ll store with the Adobe-related credentials. (Note that SAS values can be, and typically are, generated dynamically. For this article we’re using one created with a long-term expiration to keep things simpler.)
Note that you can also point the APIs at any URL that can be publicly read, or POSTed to for results. Setting up an image or PSD on the web is easy enough, but to handle the POST result you would need a server prepared to accept, and handle, the content.
What we are building
For this demo, we’ll write a script that makes use of the Remove Background API. As you can probably guess, this API will intelligently figure out the part of the image that represents the focused, foreground object, select the rest as the background, and remove it. Here’s an example taken from our docs:

For the purpose of this post, the script will take a hard-coded input file available on our Azure Blob storage system, ask the Photoshop API to perform the Remove Background API on it, and write the result back to Azure with “-modified” added to the filename as we can compare and contrast. In a real environment these values would be more dynamic, would possibly overwrite the original if not needed, and so forth.
The code
Now for the fun part, actually writing some code! As stated above, we’re going to be using Node for this post, but everything we’re covering here could be done in any other language.
Let’s start off by getting our dependencies:
First, we load in the node-fetch package, for our demo we specified the 2.x release which still works with require. This was done via npm install node-fetch@2. Next, we load in the dotenv package to help set up our credentials. You'll see that portion next. Finally, we load in the @adobe/jwt-auth package which simplifies creating access token for Adobe services.
Now let’s talk credentials. As stated above, we have both a set of values required to authenticate with the Photoshop API, as well as credentials for our storage. The dotenv package helps with this. In a production environment, these secrets would be stored in environment variables. For our testing, we can simulate this using a .env file with key/value pairs and the dotenv package. Here's our .env file, with the secret values removed:
By using this .env file, we can test locally without actually setting the environment variables. Now let's go back to our code and load in the values:
Alright, now it’s time to start working with the API. The first thing we’ll do is generate an access token. This is somewhat easier thanks to the jwt-auth package.
The most important part here, and this will be more important if you are generating your access tokens differently, is the metaScopes value. This is required for working with the Photoshop APIs.
Next, we’ll specify the input and output values for our test:
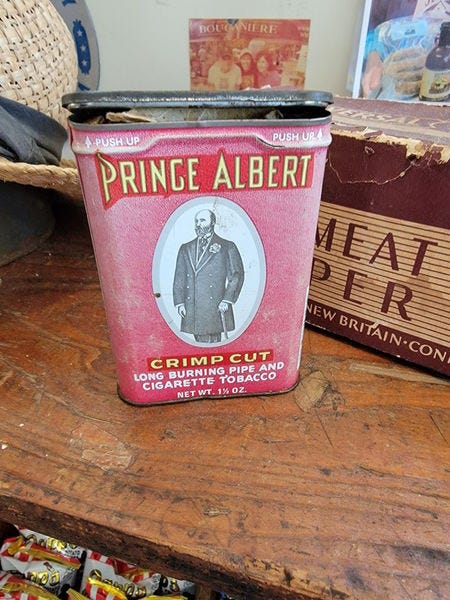
The file we’re using to test here, oldcan.jpg, is seen below:
Now it’s time to actually hit the API. Doing so requires us to specify what are input and output will be. The API supports multiple arguments related to how it should work with the data, but we can use the defaults and focus on specifying where to read and save data. Details about the arguments can be found in the API reference.
Note that the API call requires the access token generated before, the client id value, and are arguments that we created in the data variable.
After firing off the request, we can then get the response:
Here’s what that response looks like:
This response contains a unique URL (in the href value) that queries the status of the API operation. Here's where things get a tiny bit tricky. We need to check this job to see how doing and keep checking until the job is done. There's a variety of ways of doing that, here's how we solved it in our sample application:
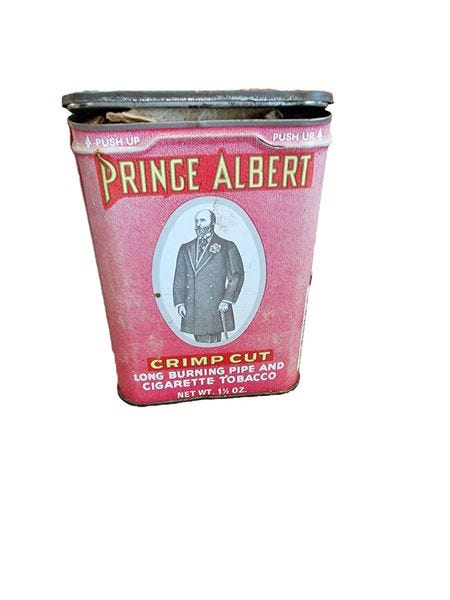
Basically, while the job is in any kind of “still doing crap” status, we delay for five seconds and then check the job. Here’s an example of what that final result could look like:
And here’s the result:
You can find the complete version of this script below:
Next steps
Now that you’ve seen an example of the API in action, be sure to check the docs for many more examples of what can be done. In our next blog post, we’re going to demonstrate how to use the Photoshop APIs within an automated system.