Hybrid Personalization in the Adobe Experience Platform Web SDK

If you’re using Adobe Experience Platform (AEP), you’ve likely already heard of the Web SDK, also known as alloy.js. It’s a client-side JavaScript library that allows customers to interact with the various services in the Experience Cloud. If you’re reading this, you probably already have a working implementation of alloy on your website. And you might even be using it to display personalization content for your visitors.
But did you know there’s a new alloy feature that allows you to display personalized experiences at lightning speed? It’s called Hybrid mode. And in this post, I will tell you everything you need to know to get up and running.
Hybrid what?
Many Adobe Target users are already familiar with the concept of hybrid personalization in at.js. It’s a great way to optimize page performance by moving the request for personalization from the browser to the server.
Hybrid mode reduces latency and can eliminate page flicker, it also guarantees data privacy. Users of at.js have long enjoyed these benefits, and now with the release of v2.13.0, users of alloy (AEP Web SDK) can too!
Before we dive into hybrid, let’s first review the three keys of personalization. And then examine the first two implementation options to get personalization content into a website via Adobe Experience Platform.
The three keys to personalization
There are three key technical details that must be in place for personalization content to work on the web. It’s important to be aware of them so you can see how each one is handled in each implementation.
The first key is cookie management — getting and setting cookies that track visitors and guarantee requests are always routed to the same experience edge cluster. The second key is to request personalization content from the interactive data collection endpoint of the Adobe Experience Platform APIs. And the third key is to render personalization content in the browser.

Client-side Implementation
The client-side approach is the easiest and simplest way to get personalized content. All you have to do is include the Adobe Experience Platform Web SDK (alloy) library on your page, configure it, and invoke the sendEvent command. It is the fastest way to get up and running with AEP on the web.

Alloy takes care of all the heavy lifting
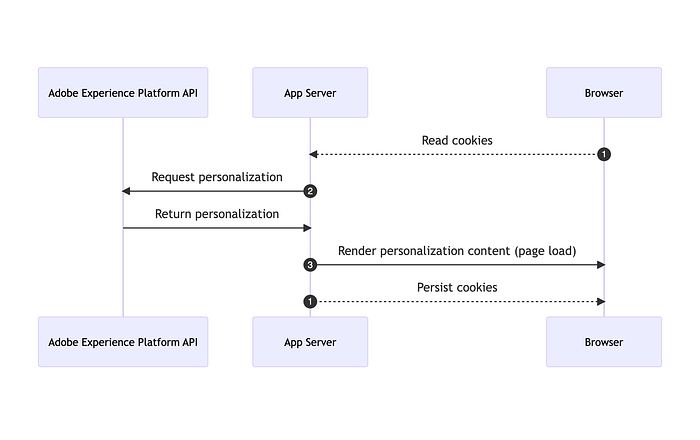
Behind the scenes, alloy automatically takes care of all three of the key technical details mentioned before. It 1️⃣ reads visitor and other AEP cookies, 2️⃣ constructs a valid request based on the sendEvent command and sends it to the interactive data collection endpoint (including the cookies). And finally, 3️⃣ renders personalization content directly to the DOM. Cookies from the API response are automatically persisted as well 1️⃣.
pros
- fastest way to get started
- cookie management for free
- API requests are handled for you
- personalization offers can be rendered in to the DOM automatically
cons
- request for personalization is made in the browser
- added latency may introduce a brief page flicker
- larger page weight by including alloy
Want to see the client side in action? Check out this fully functional sample app.
Server-side implementation
The server-side approach does not rely on alloy or any other browser-based libraries. Instead, it is implemented entirely on your application server. This is the most efficient way to implement personalization because there are no dependencies to download and no abstractions.
Without SDKs or other libraries to help, you get to manage the technical details yourself – including the three keys.
Read cookies
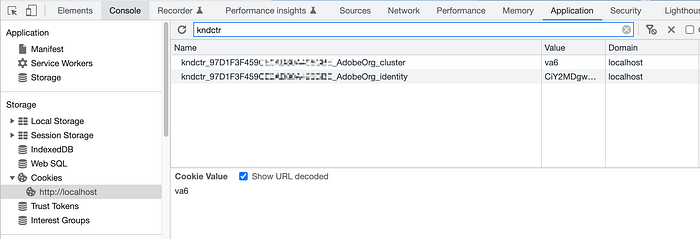
When the page loads, a request is sent to your app server. That request includes any cookies that may have been set previously. AEP cookies are prefixed with kndctr_ and need to be read by your app server. All cookies prefixed this way are important but the two most vital for this use case are kndctr_orgid_identity and kndctr_orgid_cluster. These cookies can be inspected using your browser’s developer tools.
Request personalization
After reading the cookies, the app server must construct a request for personalization and send it to the interactive data collection endpoint of the Adobe Experience Platform APIs. If you are familiar with the sendEvent command in alloy, the request looks similar — but it is a bit more verbose. If you have an existing client-side implementation of alloy, I recommend using your browser’s developer tools to inspect the API request that it makes.
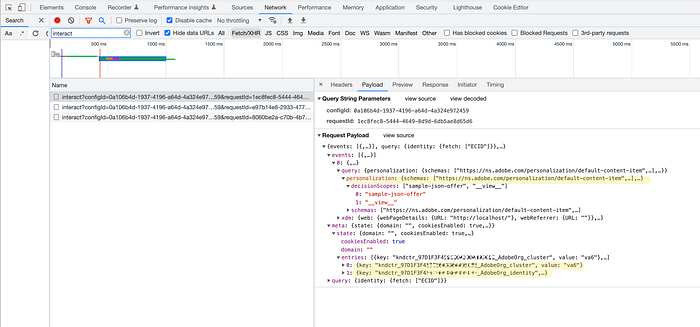
Here is a sample request payload as seen in developer tools 👆. Notice that the cookies are specified in the meta section of the payload. There is also a query section with personalization details specified.
Remember, in the server-side approach, the request for personalization is not done from the browser but rather is done from the app server. So my recommendation to those undertaking a server-side implementation for the first time is to inspect the request alloy makes and implement the same on your app server.
Here is an example of a request made via curl 👇. You can find a sample request in Node.js here.
curl -X POST "https://edge.adobedc.net/ee/v2/interact?dataStreamId={DATASTREAM_ID}"
-H "Content-Type: text/plain"
-d '{
   "event":{
      "xdm":{
         "web":{
            "webPageDetails":{
               "URL":"http://localhost/"
            },
            "webReferrer":{
               "URL":""
            }
         },
         "identityMap":{
            "FPID":[
               {
                  "id":"xyz",
                  "authenticatedState":"ambiguous",
                  "primary":true
               }
            ]
         },
         "timestamp":"2022-06-23T22:21:00.878Z"
      },
      "data":{

      }
   },
   "query":{
      "identity":{
         "fetch":[
            "ECID"
         ]
      },
      "personalization":{
         "schemas":[
            "https://ns.adobe.com/personalization/default-content-item",
            "https://ns.adobe.com/personalization/html-content-item",
            "https://ns.adobe.com/personalization/json-content-item",
            "https://ns.adobe.com/personalization/redirect-item",
            "https://ns.adobe.com/personalization/dom-action"
         ],
         "decisionScopes":[
            "__view__",
            "sample-json-offer"
         ]
      }
   },
   "meta":{
      "state":{
         "domain":"localhost",
         "cookiesEnabled":true,
         "entries":[
            {
               "key":"kndctr_XXX_AdobeOrg_identity",
               "value":"abc123"
            },
            {
               "key":"kndctr_XXX_AdobeOrg_cluster",
               "value":"or2"
            }
         ]
      }
   }
}'
Persist cookies
In the response, there is an array of handles. One of the handles has a type of state:store. It contains an array of cookies that need to be persisted.
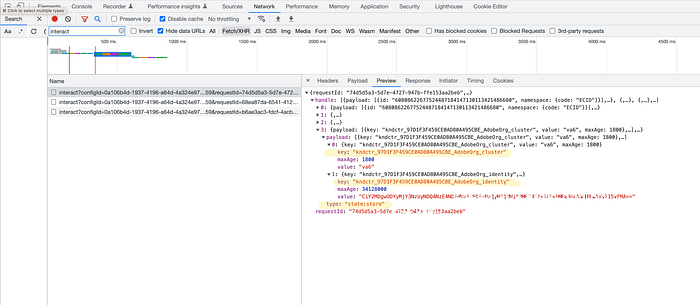
When the app server responds it must set these cookies in the headers of the response so that the browser will persist them. That way they will be sent on subsequent requests for the app server to read.
Render personalization content
Finally, in order to render personalization content, the app server needs to extract it from the API response and render it within the HTML that will be returned to the browser to fulfill the request.

The personalization content is found in the handle of type personalization:decisions.
Summarization of server-side approach
This approach offers maximum efficiency and flexibility. But you are responsible to implement each step yourself.
pros
- leaner page weight since there are no library dependencies
- high efficiency from request to rendered
- zero page flicker
- maximum data privacy
- can’t be blocked
cons
- manual cookie management
- personalization requests not automatically generated
- personalization content is not automatically rendered
Want to see server-side in action? Check out this fully functional sample app.
Hybrid Implementation
Hybrid mode combines server-side and client-side implementations. It’s the server-side implementation, but with alloy on the client-side to render personalization content. This combination has several benefits.
No page flicker
One benefit of hybrid mode is reduced latency and elimination of page flicker. When using alloy alone, a client-side request is made for personalization content during page load. This can introduce latency and a momentary page flicker while the request is fulfilled and rendered. But hybrid mode eliminates page flicker because the personalization request is made server side and the response is given to alloy on startup. That means that, rather than make a request and wait, alloy already has the content from the moment it initializes!
Request privacy
Since hybrid mode builds on top of the server-side implementation, you get maximum request privacy. This is vital when a personalization request may include data you need to keep private. Moving the request from the browser to your app server makes that request completely hidden from prying eyes.
Client-side rendering
With hybrid mode, you don’t need to render personalization content on the server side. This is convenient because you don’t have to read the personalization response, extract the details, and produce HTML with that content. Instead, you can just pass the response to alloy and let it do its thing.
How hybrid works
Hybrid mode extends the server-side implementation described previously. What’s different is how personalization content is rendered.
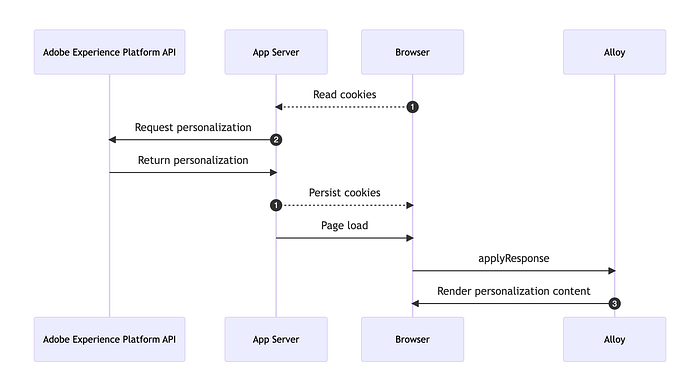
Just as in the server-side implementation, the application server manages cookies and makes a request for personalization. Then the personalization response is provided to alloy on the client side using the applyResponse command.
Hybrid’s Secret Ingredient — the applyResponse Command
The applyResponse command is similar to sendEvent. The difference is sendEvent generates and makes a request for personalization, then updates the DOM. But applyResponse does not make a request, instead, it accepts responseHeaders and responseBody objects and updates the DOM the same way sendEvent would. This is the key for hybrid mode because the personalization response is obtained server side and provided to alloy using the applyResponse command. The app server does not render the personalization content, but it does add a small snippet of JavaScript to the page that invokes the applyResponse command with the personalization response.
alloy("applyResponse", {
  renderDecisions: true,
  responseHeaders: {...},
  responseBody: {...},
});
This is the basic structure of the applyResponse command 👆. Alloy will automatically apply personalization to the DOM since renderDecisions is true. You can also add a .then clause to the command and process the response as you see fit (the same way you can with sendEvent).
pros
- high efficiency from request to rendered
- zero page flicker
- maximum data privacy
- personalization offers can be rendered into the DOM automatically
- can’t be blocked
cons
- manual cookie management
- personalization requests not automatically generated
- larger page weight by including alloy
Want to see hybrid mode in action? Check out this fully functional sample app.
Next steps
In this post, I described the various ways you can get personalization content into a web page using Adobe Experience Platform. If you’d like to go deeper, I encourage you to check out the rich alloy sample applications repository. It includes fully functional sample applications for each of the implementations described here. Each one includes working code for you to see and tinker with, along with deeper explanations of the technical details for each.