Make PDFs Searchable (OCR) After Importing into SharePoint

Let’s say you scan a piece of paper and convert it to PDF. Did you know your PDF can have its text and images processed to make it easy to search through? This also makes it easy for other applications like SharePoint, BOX, Dropbox, and others to index your content, so you can search for them in those applications.
Depending on which PDF engine you use, you might run into issues. Some PDF engines just take an image and create a PDF wrapper around it. Then your file repositories can’t index it because it’s just a glorified picture of a page.
Free tools like Adobe Scan allow you to turn your smartphone into a portable scanner. Unlike some PDF engines out there, Adobe Scan will use your Adobe Document Cloud account to OCR (optical character recognition) your PDFs, so they are indexable by your repositories.
But what about all those other PDFs that are already scanned and aren’t searchable? What if you have decades of PDFs that have been collecting digital dust because they aren’t searchable? How do you make sure that whatever documents you are importing into tools like SharePoint are searchable? Fortunately, with Adobe PDF Services for Microsoft Power Automate, this is super easy to do.
In this article, you’ll learn how to automatically OCR PDFs when they are placed in a folder in SharePoint using Power Automate. This method does not only work with SharePoint though — Power Automate integrates with apps like BOX, Dropbox, and others, but this walkthrough is a great reference.
Important Note: This article applies to typically scanned documents. Many of your PDFs, such as ones converted from Word documents, are already indexable and searchable.
How do I know if my PDF isn’t searchable?
There is an easy test to figure out whether PDFs are searchable. Open your PDF in Adobe Acrobat Reader. If you can’t select the text in the PDF, you can’t search the document. If you can, then it probably is already searchable.
What You Will Need
· Adobe PDF Services (you can get a free trial here. Note: you can get a free 6 month trial.)
· Microsoft Power Automate (you will need premium licensing to take advantage of PDF Services)
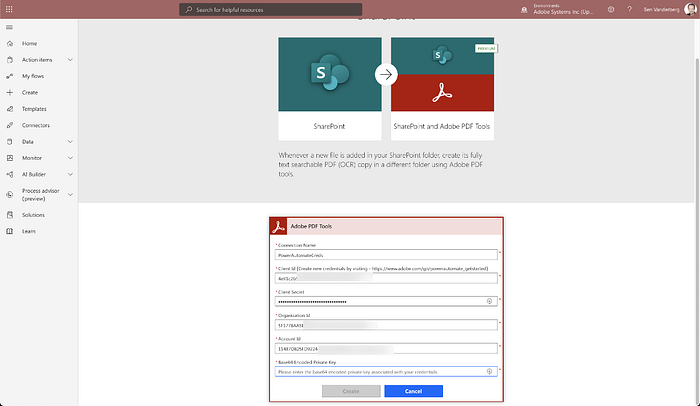
Create your Adobe PDF Services credentials

If you haven’t already created credentials to use with your Adobe PDF Services, you can create them here.
Once you supply a name and description, your client credentials will be generated. Keep this window open; you will need this information to create a connection in Microsoft Power Automate.
Create a flow from a template
Adobe PDF Services has a variety of templates pre-created to make it easy for you to get started. We are going to use one of these for this example.
1. Log into Microsoft Power Automate.
2. Use this template to get started.
3. You will need to create a connection to PDF Services. Use the credentials you created earlier.
4. Click Create.
Now that you have all your connections, you only need to make a few changes to get this template working.
5. In your trigger called When a file is created in a folder, set the Site Address to the SharePoint site you want to reference.
6. In the Folder Id, set the path to the folder you want Microsoft Power Automate to watch to generate the OCR PDF.
7. Scroll down to the Create file action and set your Site Address and Folder Id to the specified place where you want the generated documents to go.

Pro Tip: If you want to dynamically decide where the generated documents can go, you can use Dynamic Content to use variables to decide the path. Here is a helpful video to learn more about that.
See it in action
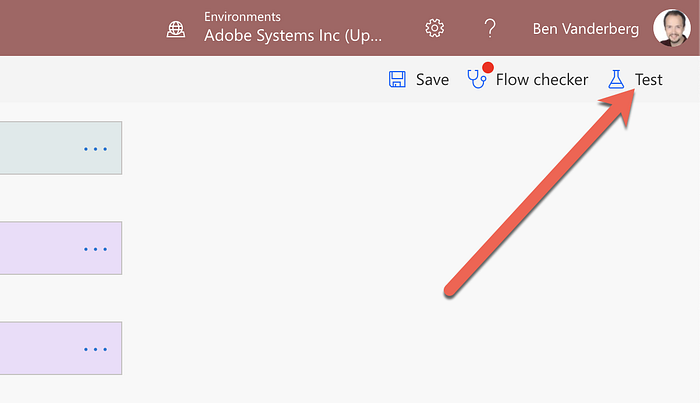
That’s it! Now give it a try by placing a file in the Input folder. Microsoft SharePoint is not instantaneous when triggering a flow, so you might need to wait 30–60 seconds before it reacts and triggers the flow.
If you don’t want to wait that long, use the Test button in your flow before you drop the files in. This will trigger it to process faster.
Search for Files in SharePoint
Now that you have that file in an indexable PDF format, try searching the contents of that document in SharePoint using search. After SharePoint indexes the file, you will then find that document found in your search results, making it easier to find your content even if it was physically scanned.
Final Thoughts
Being able to OCR documents automatically when they are imported into SharePoint makes it much easier to find the content you are looking for and convert legacy documents into a searchable format. However, this doesn’t stop at OCR. Have a look at many of the other actions available in Adobe PDF Services, such as Create PDF, Combine, Export, and other formats.
To get started, give Adobe PDF Services API a try and see what document processes you can start automating.