Split PDFs Based on Content with Adobe PDF Extract Service with Microsoft Power Automate
Use Adobe PDF Extract service in Microsoft Power Automate to split documents based on document content.

Even in the digital age, paperwork is an uphill task. Even if you migrated your business processes to PDF-based rather than paper, there’s still often manual work to process documents, split PDFs into multiple PDFs, and do other actions.
In a recent customer use case, a customer had many invoices they receive from one of their vendors as one large combined PDF. For the customer’s process, they need these separated again, into separate PDFs for internal routing and processing. The only issue is that the number of pages per invoice can vary. Because they don’t create the PDF, they have no control over whether those documents have a logical point like a bookmark to programmatically separate.
Fortunately, one great tool to help with this is Adobe PDF Extract API, which takes our PDF documents and turns them into JSON data to create workflows based on content in the PDF using AI. Adobe PDF Extract service is now available as actions in Adobe PDF Services connector in Microsoft Power Automate to make that even easier.
What you are going to need
- Microsoft Power Automate
You will need access to premium connectors. - Adobe PDF Services
If you don’t already have a subscription to Adobe PDF Services, you can get a free trial or learn more about subscribing here.
Scenario
In this scenario, we have a workflow that is manually triggered. In the trigger, we will upload a PDF document containing multiple invoices. Some of them are many pages, some of them are shorter. In our flow, we want it to split the PDFs based on the detection of a new page with the invoice header.
For those who want to skip ahead, a copy of the flow described here can be downloaded on GitHub. You can learn how to import a flow here.
Starting trigger
In this example, we’re using a Manually trigger a flow action to start the flow. There are many different ways you could trigger this for your workflow, though a couple of other common ways you could trigger your flow is when you receive an email to an inbox, when a file is uploaded into a specific folder, or all sorts of other triggers.

Getting PDF content
From the file that is uploaded from the trigger, we want to then pass that file to Adobe PDF Services to extract the content.
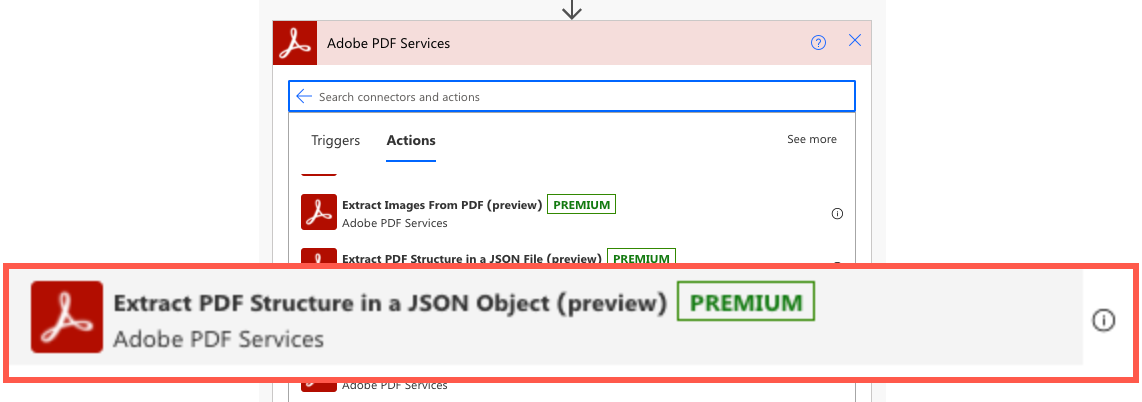
- Add a New action to your flow.
- Search for and select Adobe PDF Services.
- Select Extract PDF Structure in a JSON Object.
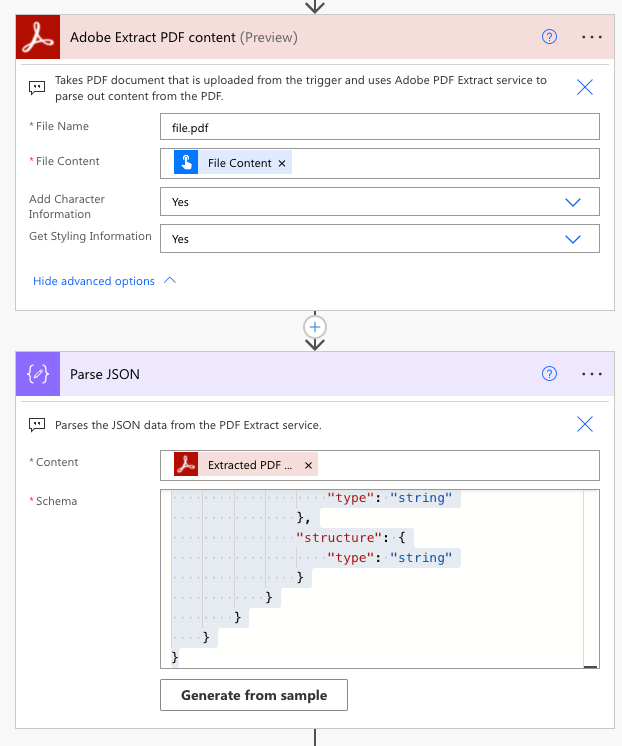
Now that you have that selected, you want to set the following in your action:
- File Name: You can set this to file.pdf. It doesn’t matter as long as it ends with .pdf.
- File Content: Use the Dynamic Content panel to get the content from the trigger or previous action to get the content.
- Add Character Information: Gets the Character Information for the styling of characters. In this scenario, this is not necessary.
- Get Styling Information: Gets the styling information of content.
After adding our PDF Extract action, we need to parse the PDF content. Fortunately, this can be done using the Parse JSON action built into Microsoft Power Automate.
- Add a new action to your flow.
- Search for Parse JSON and select it.
- Set it to the Extracted PDF Structure value from the Adobe PDF Extract action for your Content field.
- For your schema, you can generate one, but to make it easier, you can copy the schema from GitHub here and paste it into the Schema field.
Once you have done that, you will now be able to select items from the PDF content from your Dynamic Content panel.
Using Search Array to find content in PDF
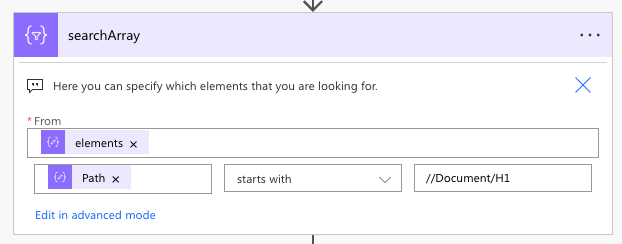
Now that we have the PDF content in JSON format, you can filter for content inside the PDF. In the JSON structure, there is an array called elements containing the different elements of information in the PDF. Each element looks something like this:
{ "Path": "//Document/H1", "HasClip": false, "Bounds": [ 36, 727.099853515625, 197.7562255859375, 758.5664367675781 ], "TextSize": 22.020004272460938, "Lang": "en", "Page": 0, "Text": "Halliby: Invoice ", "attributes": { "LineHeight": 26.375, "SpaceAfter": 18 }, "CharBounds": [ [ 36, 727.099853515625, 50.42308044433594, 758.5664367675781 ], ..., "Font": { "name": "MCHVUF+CenturyGothic-Bold", "weight": 700, "alt_family_name": "Century Gothic", "monospaced": false, "encoding": "WinAnsiEncoding", "embedded": true, "family_name": "Century Gothic", "font_type": "TrueType", "italic": false, "subset": true }}
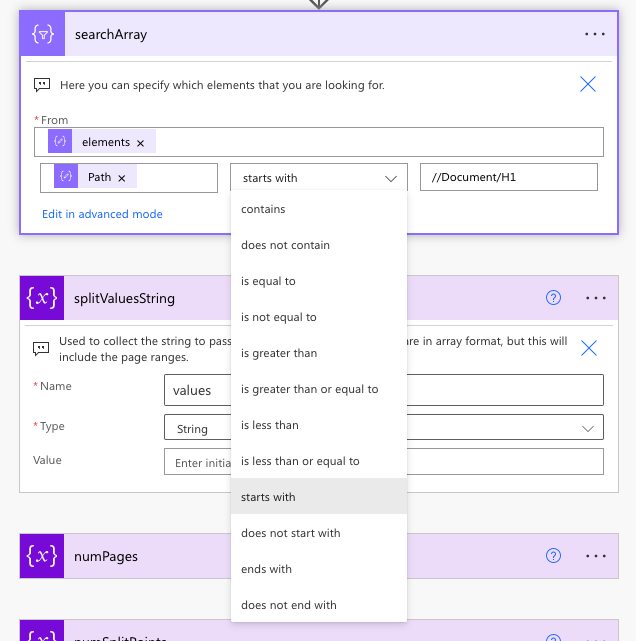
In this, you will notice that there is a lot of information available to find and identify content. For this example, because all of the invoices were made from the same document generator, all of the titles at the beginning have the same styling, in the same order in the document, so all of the titles have a path of //Document/H1 so we can assume that Path starts with //Document/H1. Each subsequent instance will have brackets such as //Document/H1[2] .
There are lots of ways that you can leverage this content. Here are a couple of ways:
Path
"Path": "//Document/H1"When the document is parsed using Adobe PDF Extract API, it is processed by Adobe Sensei AI/ML services to understand the context of which parts of the PDF are paragraphs, headers, lists, tables, etc. Each of these are then provided a path inside the document. This can be really useful because if you are extracting data from documents that are very similar, the path will be the same or similar and that can be used to find or identify information.
Text
"Text": "Halliby: Invoice "Text is where the text content is contained. This can be helpful if you are wanting to find elements that contain a certain value, such as a word, a set of words, etc.
One important note is that Power Automate doesn’t natively support Regular Expressions (Regex) but there are some ways that people have figured out how to use Regex within Power Automate with Excel. There are also a number of options that you can use to compare strings.
Font and styling
Many different PDF parsing tools don’t include styling information. For sighted people, font, size, and styling information can be a helpful clue as to the context of that document. For example, a set of text size 22, in Century Gothic Font, with a font-weight of 700 (aka Bold) might indicate that something is the title on the page. Something italicized can be an indicator that it is an important word.
Font and styling can be beneficial to finding content in PDF documents. Fortunately, PDF Extract API provides this information for each element so that you can use this to help search for content.
"Font": { "name": "MCHVUF+CenturyGothic-Bold", "weight": 700, "alt_family_name": "Century Gothic", "monospaced": false, "encoding": "WinAnsiEncoding", "embedded": true, "family_name": "Century Gothic", "font_type": "TrueType", "italic": false, "subset": true}
Creating Variables for Loop
There are a few ways to do this, but using variables in Microsoft Power Automate can be useful to track info as we are processing content. For this scenario, there are a few we have created:
- values (string) — Used to collect the string to pass into the Split PDF action. These are in array format, but this will include the page ranges.
- numPages (integer) — Convenience variable for referencing body(‘Parse_JSON’)?[‘extended_metadata’]?[‘page_count’]
- numSplitPoints (integer) — Calculates the length of the searchArray-1 because this number is used during the loop along with the iterator to change behavior once it gets to the last item. This is calculated by using an expression
sub(length(body('searchArray’)),1). - startPoint (integer) — Is used to store the starting page for a page range.
- endPoint (integer) — Is used to the end page for a page range.
- iterator (integer) — Used as an iterator for loops.

Loop to find page ranges
At this point in the flow, we have our variables setup and we have a filter array to collect all of the elements that are H1 headers (searchArray). We next need to loop through each of the elements in the searchArray to get the page ranges for each invoice so it will later be passed to Adobe PDF Services to split the PDF into separate PDFs.
There is an important design we need to consider for in the workflow design. When PDF Services extracts the content elements, the pages numbers it provides are counted started from zero (0, 1, 2, 3, 4) like a lot of programming languages. For the Split PDF action, on the other hand, page ranges start from page one (1, 2, 3, 4). For this loop, we will need to translate between the page numbering difference and build a string with a set of page ranges to pass to the Split PDF action.
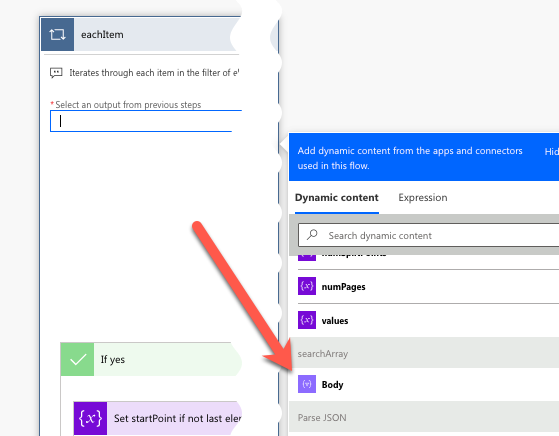
When creating the loop, use the Dynamic content panel to pass in the Body variable from the searchArray action we previously created.
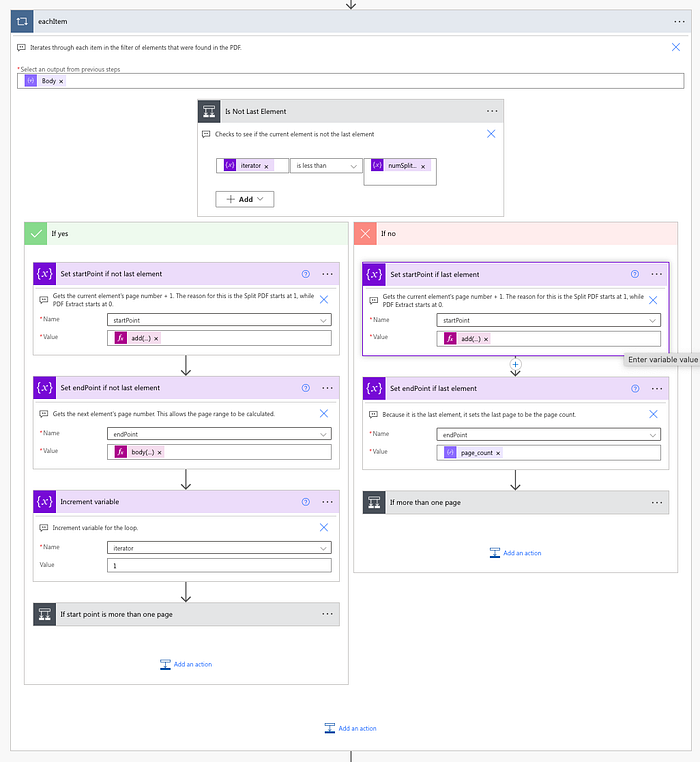
Within the loop, the way we treat the last element in the array is different than the rest of the items. We want to use a Condition action to separate how we treat all elements except the last one. We can do this by making the following comparison in the condition:
iterator is less than numSplitPoints
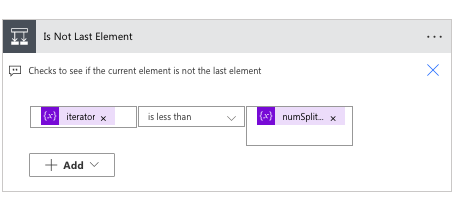
Remember, numSplitPoints calculates the total size amount of items in the searchArray. As part of this process, we will increment the iterator, so once the iterator is not less than the numSplitPoints, we will know it is the last element.

Next, let’s set up the If yes section of the condition, which will be for every element except for the last item. In this, we will need to do the following:
- Set the startPoint variable
- Set the endPoint variable
- Increment the iterator
- Append the array to the values variable
Expression for startPoint
For the startPoint, we need to first create a Set variable action. For the Name, set it to startPoint. For the value, we will need to build an expression with the following value:
add(body('searchArray')?[variables('iterator')]?['page'],1)
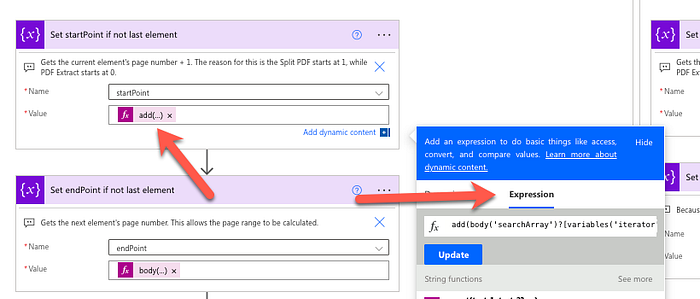
Once you have added the expression, you have entered the expression. You can click OK (in the screenshot above, it says Update, but it will say OK if you are doing this for the first time).
Here is what this expression is doing:
add()means addition, soadd(1,2)will return 3.body('searchArray')?[variables('iterator')]?['page']is getting the page value from the item in the array that is of the value iterator.
This means that the startPoint variable is being set to the page number in the current element + 1 to align with the numbering for the Split PDF action.
Expression for endPoint
For the endPoint, we will still need to create Set variable action and use an expression. However, this is a more straightforward expression:
body('searchArray')?[add(variables('iterator'),1)]?[‘page']
In this case, this is just simply setting the variable to the page value of the current item in the loop using the iterator value.
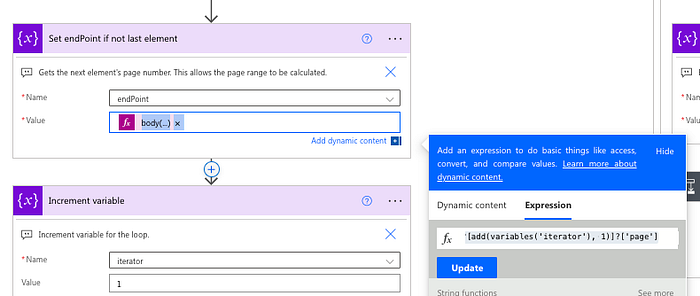
Increment the iterator
Next, you need to increment the iterator. You can do this using the Increment variable action. Set the name to iterator, and set the value to 1.
Compensating for single pages
The page range is passed to Split PDF by using an array-like format. If you wanted to capture the page ranges 1–2, 3, and 4–5, then it would be written:
1-2,3,4-5
However, Split PDF does not accept a range like 3–3. You need to write it as a single number, so we need to have a condition to compensate for how this is written to the output variable.
To fix the single page issue, a simple condition checks if the startPoint and endPoint variables are not equal. If this is true, we can use an Append to string action to append the range startPoint-endPointto the values string variable. If not, then it will just write the page startPoint,.
To compensate for this, there is a simple condition that checks if the startPoint and endPoint variables are not equal. If this is true, then we can use a Append to string action to append the the range startPoint-endPoint, to the values string variable. If not, then it will just write the page startPoint,.

We have now completed everything within the If yes category for if it is not the last element. Now we need to add the logic for the last element.
If the last element
Once we get to the last element, we need to write a slightly different addition to the list of elements. The logic will be similar to the “If Yes” section of the flow but with slight variations.
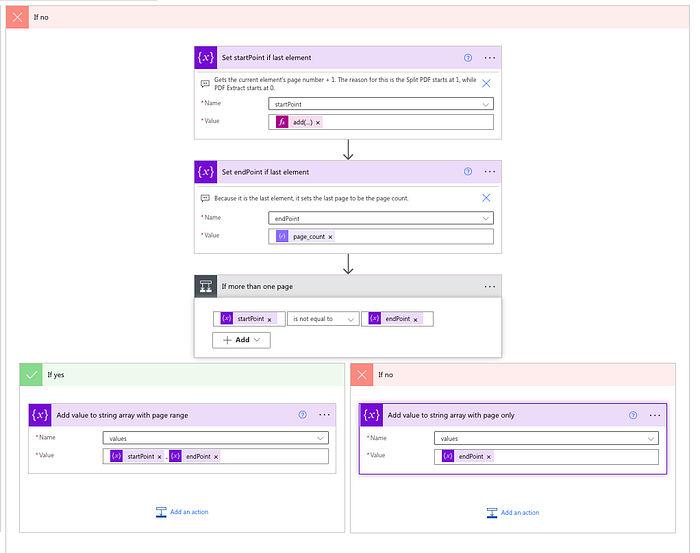
First, we want to set the startPoint variable with the same value as we did for the startPoint value in the If yes section with a Set Variable action. You can copy this action.
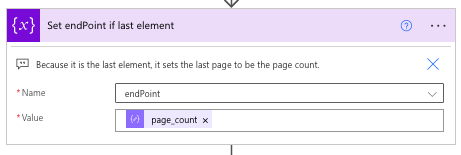
Next, we want to use a Set Variable action to set the endPoint to the page_count. This way, it will just collect the rest of the PDF in the last PDF.
In the final step of this, we are doing similar to what we did with the condition at the end of If yes to append the ranges, but what is different here is that it doesn’t include a comma at the end because there won’t be an item after that.
We have now collected all the information we need about the document. We have the page ranges we want to split into many PDFs, now we just need to actually split the PDF.
Split PDF
After the loop is processed, we can add an action called Split PDF as part of Adobe PDF Services. Within this, we will have a few values we need to populate:
- File Name — You can set this to anything as long as it ends with .pdf. Ex. file.pdf.
- Split Type — Set this to Array of Page Range.
- Split Configuration — Use the Dynamic content panel to insert values variable.
- File Content — Set this to the File content variable from the trigger.
Saving files to storage

Now that we have an action for splitting, we likely want to save these files to a location. In this case, we can use a loop (Apply to each action) to save each file and store it in SharePoint. For the input to the loop, we can use Dynamic content panel to set it to Split Document from the Split PDF action.
Within the loop, we can then Add an action called Create File from SharePoint. This we can then set to the following values:
- Site address — Address to the SharePoint site you want to save to.
- Folder Path — Path where you want your documents saved.
- File Name — The name of the file. You can use anything, but in the example, we use the header name from the PDF content by using the expression
body('searchArray')?[variables('iterator')]?['Text']. - File content — Set this to Split Document File Content variable using Dynamic content.
Give the flow a try
We now have completed the flow, so click on Test in the top-right corner to run the flow, upload the file and see if your flow works. If you have any issues, you can look at the sample flow to know where you may have had errors. There is also an example document included.
Final thoughts
Adobe PDF Services provides a great way to automate document actions using content stored in the PDFs. The addition of PDF Extract service to Power Automate makes it easy to automate these based on content without writing and building AI models.
If you would like to start using Adobe PDF Services with Microsoft Power Automate, get started with Adobe PDF Services.