Using the Adobe Photoshop API on Workfront Fusion
How can Workfront Fusion help you optimize your Photoshop tasks?

Adobe’s Workfront platform is an incredibly powerful, flexible system to help organizations work better together and collaborate at a higher level.
As part of that platform, Workfront Fusion is a low-code automation system that allows for complex workflows that can be triggered in many different ways.
Let’s take a quick look at what’s involved with creating a Workfront Fusion workflow that integrates with the Photoshop API.
Prerequisites
Before attempting this, do know that you’ll need an active Adobe Workfront account as well as credentials to use the Photoshop API. You can sign up here to get your credentials for a free trial.
What We’re Building
For our demo, we’re going to build an integration with Dropbox’s cloud storage platform.
This workflow will monitor a Dropbox folder. When a new file is placed there, it will use the Photoshop API to make a call to the Lightroom AutoTone API. This API does multiple enhancements to a picture, focusing on improving things like expose, contract, and so forth.
Once the optimization is done, the resulting image will be saved in a new folder in Dropbox.
There are multiple use cases where this could be handy. For example:
- Incoming photos for a travel blog could be saved to Dropbox. The optimization process will fire off automatically and the results could be used for new articles.
- A social media site could offer, as a paid upgrade, optimization services for users’ social media posts including photographs.
- A real estate broker could use this process to automatically improve photos for new listings.
These are just a few examples. Remember the Photoshop API has numerous features and our particular example is going to use just a small piece of the Workfront Fusion platform.
Creating our Scenario
Let’s now walk through the process of creating our workflow, or in Workfront Fusion’s terminology, a Scenario. Scenarios are made up of modules that represent each step of the process you’re automating. Let’s begin with the initial module: our Dropbox monitor.
The Dropbox Trigger
The first module is the Dropbox “Watch Files” trigger:

It requires two things: a Dropbox account and a folder. When we first add the Dropbox “Watch Files” trigger, we’llbe prompted for an existing connection, or asked to create a new one.
In this screenshot, we’ve already got an existing connection so we can use that, and once that’s done, select a folder. Finally, set the limit to 1 as we want to process one file at a time.

Getting Our Dropbox Links
The Photoshop API methods require an input and output URL that must be publicly readable links.
For us to do this, we’ll need two modules. The first will generate a link to download, or read, our input. This can be done by selecting the Dropbox “Create/Update a Share Link” module.
While this module has multiple options, we only need to worry about the File Path. Here’s where Workfront Fusion shines. If we select that field, we get a list of things we can select:

In this case, it’s referencing the results of the previous module, the trigger, and we can select “Path lower” to reference the newly added file:

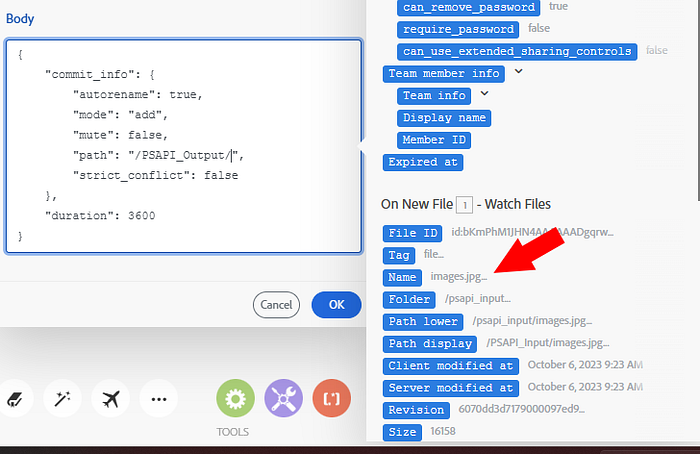
Next, we need a module that will create a link to our output folder for uploading. There isn’t a built-in module for this, however, we luckily have a module that allows for ad hoc API calls, “Make an API Call”:

Once added, we need to configure it. The Dropbox API reference is handy here and points to the endpoint, /2/files/get_temporary_upload_link to suit our purposes.
We set the method to POST and then define our body. The general form of it would look like this:
{
    "commit_info": {
        "autorename": true,
        "mode": "add",
        "mute": false,
        "path": "/PSAPI_Output/NAME",
        "strict_conflict": false
    },
    "duration": 3600
}
Where the path value is critical.
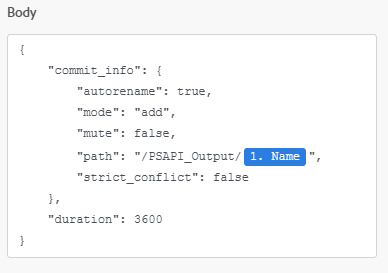
Here we've defined our output folder, /PSAPI_Output, but we need NAME to be dynamic. Again, Workfront Fusion helps. We can erase NAME, and put our cursor after the trailing slash, and Workfront Fusion will offer multiple values we can include as a variable. In this case, the Name from the trigger will return the filename, but not the path, of the new file.
When done, the body looks like this:
Preparing the Photoshop Credentials
This next step is, technically, optional, but in general it’s not a good idea to embed API credentials directly in code.
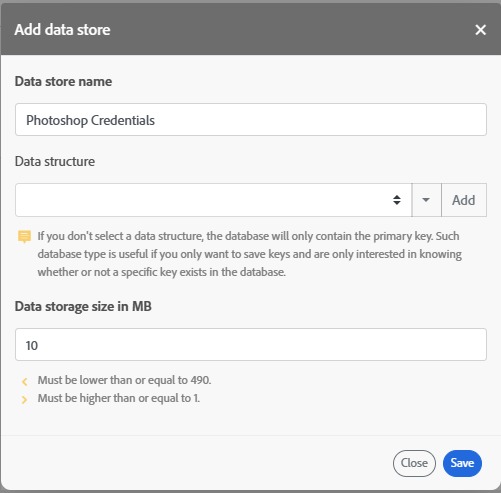
So for our scenario to work with the Photoshop API, we’ll use a feature of Workfront Fusion useful for storing information, Data stores and structures. In the Data stores, click to add a new store and give it an appropriate name, like “Photoshop Credentials”.
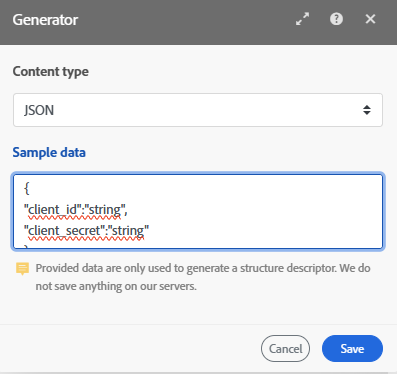
Next, we’ll need to define a data structure (or select an existing one). Clicking on Add gives us a user interface to define a structure name and how our data will look. Photoshop credentials consist of a client ID and secret. We can define it using the generator and some sample data:
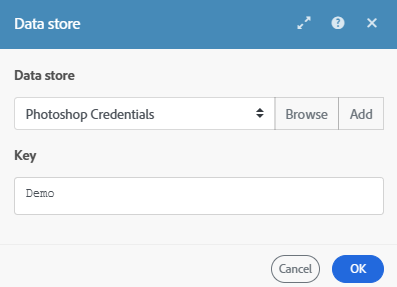
We save the structure and then save the store. Once done, we can click to Add a new instance of data. In this case, we need to provide our client ID and secret, as well as give it a name: in this case, “Demo”:

Now our scenario can grab this value, and of course, any other scenario we build can grab it as well. We can add a module, select “Data store”, and then “Get a record”. In the dialog, we select the data store and type in the key name used previously.
Getting our Access Token
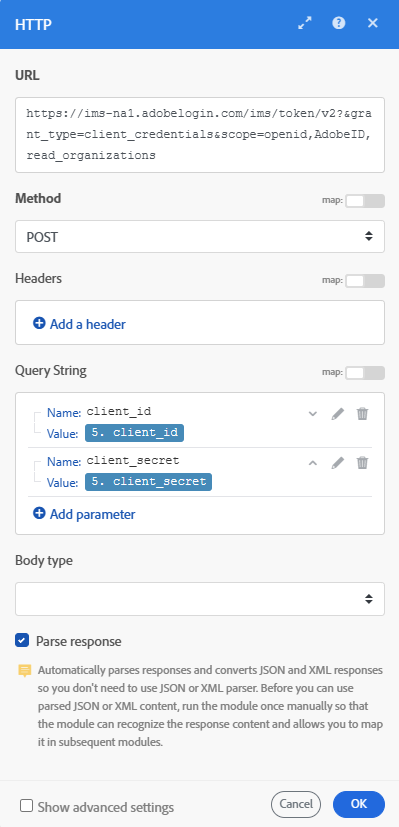
Before we can make calls to the Photoshop API, we need to exchange our client ID and client secret for an access token. To do this, we add an HTTP module. That module needs to make a POST request to https://ims-na1.adobelogin.com/ims/token/v2?&grant_type=client_credentials&scope=openid,AdobeID,read_organizations. In this request, we can pass two query string values - one for client_id and one for client_secret, and we'll use the values from the previous module. Also, we ask Workflow Fusion to parse the response JSON into data. Here's how the completed request looks:
Kick off the Lightroom API
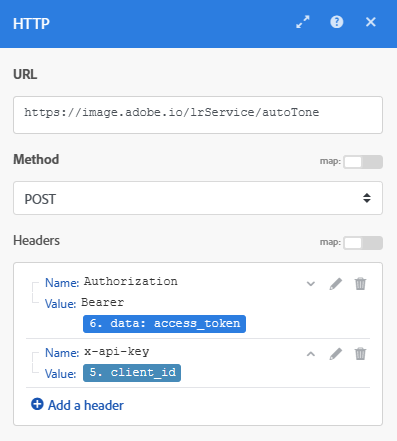
Finally, we are ready to make our request! As mentioned, we plan to use the Lightroom AutoTone API. The API reference documentation for this endpoint dictates what’s required. So using that, we can add a new module to our scenario, once again using the HTTP module.
Our URL will be the endpoint from the docs, https://image.adobe.io/lrService/autoTone and the method will be Post. For authentication, we need two things. First, an Authorization header that uses the access token returned from the previous module, prefixed with 'Bearer '. Secondly, the client ID value is passed in a header named x-api-key:
Remember that when we click in the module’s form fields, we can get those earlier values easily by Fusion’s list of variables shown to the right.
Select ‘Raw’ for body type. Again, referencing the docs, our JSON needs to look like so (in this case, just using the required parameters):
{
  "inputs": {
    "storage": "dropbox",
    "href": "download url"
  },
  "outputs": [
    {
      "storage": "dropbox",
      "href": "upload url",
"type":"image/jpeg"
    }
  ]
}
We can paste this into the module’s “Request content” field, and then we need to replace the two href values. For input, we'll reference the result of the Dropdown download link. For upload, it will be the second module we built to hit the API.
Wrap Up
Believe it or not, that’s it! We can test this right away by adding a file to our Dropbox folder and running the scenario.
Obviously, the results will depend based on the quality of the source image. Also, note that we aren’t checking for errors here. That’s something that could be added to make the scenario even more robust. To get started, sign up today for your free trial of the Photoshop API!