Working with PDF Extract and Jupyter Notebooks

Recently we launched our first Python SDK specifically for support with the Adobe PDF Extract API. This was particularly exciting to me as I’m new to Python and I’m really enjoying learning it. One of the things I’ve run across in my exploration of Python is the use of notebooks. In this post, I’ll explain how to use the PDF Extract API and Python in this environment, covering both Google’s Colab platform and notebook support within Visual Studio Code.
What is a Jupyter Notebook?
Jupyter Notebooks comes from an open-source project designed to create a sort of interactive playground for working with code. To be honest, I’m still fairly new to the concept and it was difficult for me to truly wrap my head around what they did, but now that I’ve spent a little bit of time with them, I’m kind of blown away.
At the simplest level, a notebook consists of cells. A cell can be text or code. While we’re focusing here on Python, other languages like R and Haskell are supported as well.
Text in a cell can be used to describe what’s going on, so in some ways it’s much like code comments, but with rich Markdown support, it becomes a bit easier to read as well as provide richer documentation.
When a cell contains code and is run, its output will be printed directly beneath the cell. In many cases, you can provide more rich output than usual with tables that are nicely rendered with sorting features or charts that make the results easier to read.
And here’s what really sold me on the idea. While you can run a notebook from start to finish, you can also run one cell at a time. So imagine a two-step process. Step one gets data from some source. Step two then manipulates that data. You can run the first cell, then the second, realize you messed up, and choose to rerun just the second cell. It will simply make use of the last result from the previous cell.
With a web-based interface, a person using the notebook need not worry about environments and dependencies. In fact, they don’t even need to be developers, as the notebook can walk you through the entire process.
Here’s an example created in Visual Studio Code as a simple example:
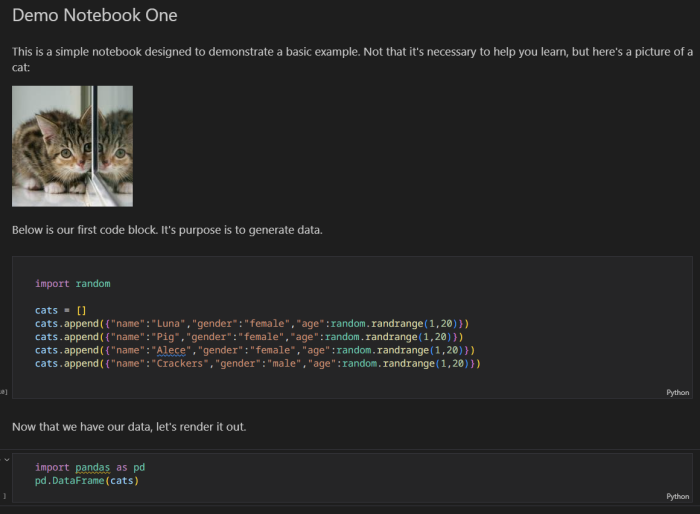
This is a notebook consisting of four cells. The top one is Markdown rendered in HTML. If you click inside the cell, it switches to an editing mode.

The second cell contains a few lines of Python code that generates data. It creates a list of cats where age is random. The third cell is more text and the final cell simply prints it out. For those new to Python like me, pandas is an open-source tool for data analysis. In our case, we’re simply going to use it to output a nice table.
If you run this notebook, each code step will execute in order. You can then see the output below the final cell:

Now for the fun part. You can go to the first code step and choose the “Execute cell and below” option which will show new ages for the cats. But — if you do the same operation on the code cell just displaying the data, it won’t change. It simply uses the last result.
Imagine now that the first cell was a somewhat slow operation. This means you can skip rerunning it multiple times as you iterate over how you work with that data.
As I said, I’m still fairly new to all of this and I’m sure I’m not adequately describing the full awesomeness of what can be done, but it’s already changing how I think about working with Python.
Using Notebooks with PDF Extract — Google Colab
For the first example of using PDF Extract with Jupyter Notebooks, we’ll look at Google Colab. This is a free, completely web-based way to use notebooks. Everything is run in the cloud with no need for any local installations.
After opening up Google Colab, create a new Notebook. In order to use the Adobe PDF Services SDK in Google Colab, you have to install the SDK first. This can be done in a one-line code cell like so:
!pip install pdfservices-sdkAfter that, you can write your code as you would normally. Notebooks can have associated files, which means they can read a PDF file and store results to the associated notebook’s files. Create another cell and use this Python code:
This code will look for a few things. First, it assumes a file, sample.pdf. Secondly, it assumes credential files as well. Google Colab lets you upload files of your choosing to your notebook. It's relatively safe for us to upload our credentials because shared notebooks will not share files. Click the "folder" icon the left-hand side of the site and in the files panel, use the upload icon to upload a PDF, your credentials JSON file, and your private key. Remember that our code is looking for sample.pdf, but the files panel includes a simple rename function so be sure to rename your PDF after uploading.

You can then test the Notebook using the Runtime menu on top and selecting Run all. You can then watch as the notebook executes. You'll see output from the cell where the SDK was installed as well the Extract operation.
If everything went to plan, you’ll have an output.zip in your files panel:
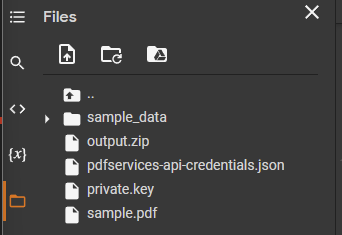
If you mouseover output.zip, you can choose the download option and you're good to go. If you want to repeat the process, click in the code cell with the Extract code, and in the Runtime menu, select Run after. This does not mean, as I thought, run cells after the current one, but instead means, run the current cell and any after.
Doing so will give you an error:

This is an expected error as the SDK will not let you save the output of an operation over an existing file. You would find the same issue run “in the usual fashion” on your own machine. And the solution would be the same. Either remove output.zip, or rename the file to be used in the code.
You can find a notebook of the above, with some additional text, here:
https://colab.research.google.com/drive/1yUzQ5oC9O0d7iS7y905glQs7Tj6oTHd8?usp=sharing
I’ve used the text cells feature to pretty much provide the same context as documented above.

Improving the Experience
We can further build upon this notebook and make it much more flexible. For example, Google has published their own Python module to add utilities to Colab, one of which gives you the ability to prompt for a file upload. Here’s the code:
The last line extracts just the name of the file that’s uploaded. When run, you get a basic web-based upload prompt:

We can then use the result in our next step. Here’s an updated cell that Extracts from the upload file and handles making the zip filename a bit more dynamic. If you upload foo.pdf, you'll get foo.zip.
Finally, we can use another feature from the Google Colab module to force a download of the zip:
You can play with this notebook here: https://colab.research.google.com/drive/1kNubpPw0JaXaCxxpspxtzOMvf2DkqIxj?usp=sharing
I want to quickly give a shout-out to my coworker Richard Cohn for improving this workflow!
Working with Extracted Data
So far our notebooks have only performed an extraction. They haven’t actually done anything with the result. We can modify the previous workbook to extract the JSON result from the zip file generated by the Extract API. This JSON file can be pretty complex (see our docs for a good overview of the different parts of the JSON file), but for now we can simply get the raw text. This is done with the code below:
Now the notebook will let you upload a PDF, run the Extract API on it, and return the text content. Here’s the link: https://colab.research.google.com/drive/1mg5bPJxNHClf_Gu5VQP-jrVXbdNOGA2U?usp=sharing
Using Notes with Visual Studio Code
Visual Studio Code provides excellent support for Jupyter Notebooks via its extension. Microsoft’s docs give a good overview, but the easiest way to quickly start is to make a new file and use the ipynb extension. This will create a new notebook and use an authoring system much like Google Colab:

You can then use the buttons on top to add text (Markdown) or code cells. You can run your notebook via the “Run All” link on bottom. For the most part, the editing experience is pretty much the same. You can add as many code and text cells as you need.
Google Colab also lets you download your online notebooks as ipynb files.
Going Forward
To begin playing with the PDF Extract API, sign up for a free trial today. You can peruse Python examples on our GitHub repo. Interested in learning more about Python? Fellow Adobian Ben Forta has written an incredible introduction to the language that I highly recommend, “Captain Code: Unleash Your Coding Superpower with Python”.