Find Out Why Your AEM Integration Is Not Working
How to debug in REST-based integrations.

As AEM developers, we often encounter situations where third-party plugins are used to enhance the site’s functionality. Often you don’t have the plugin’s source code — and when the integration does not work ad hoc as expected troubleshooting can be challenging.
There are two types of integrations:
- Frontend integration — the browser has a connection to both AEM and the 3rd party service. This sometimes is referred to as a mashup. If your plugin uses this strategy, you can use the browser’s development tool and you can stop reading. This article is not for you.
- Backend integration — the browser connects to AEM, only and the 3rd party service is called from there.

Backend integration’s often are a black box. You don’t really know what’s going on. Debugging is more difficult. These are your options:
- Remote-attach a debugger and have the code decompiled by the IDE
- Crank up the log level to trace
- Eavesdrop on the communication
Reading logfiles of course is the easiest solution. But you depend on the plugin’s diligence of logging. Not everything that would be of interest might be logged by the plugin.
I’ll save the tips how to remote debug a 3rd party app for later.
Let us explore how we can eavesdrop on the communication. We can either
- sniff the IP traffic at the network level
- route the traffic through a proxy server
IP sniffing

IP traffic analysers like Wireshark are not for the faint of heart. They are too low-level and more useful for system administrators looking into issues at the hardware and protocol level. Also, this is of limited use in our case, as the traffic usually is encrypted. IP sniffers cannot decrypt the payload. Plus — if you are working with a company laptop chances are your IT won’t allow you to install low-level tools (that require admin rights).
HTTP Proxy
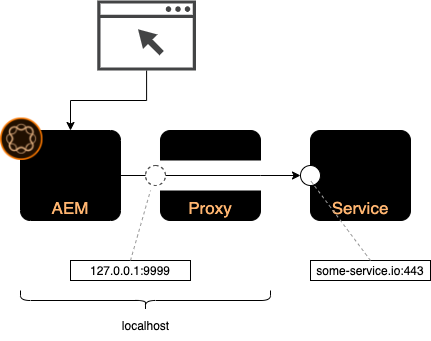
The better option is using an HTTP proxy between the requesting client A and the service S. We have two alternatives for this setup:
- Transparent proxy
- Reverse proxy
Both solutions place an HTTP proxy P in between A and S.
The main difference is how you configure A — and more importantly — what configuration options A offers to begin with:
Transparent Proxy
Setting up a transparent proxy is similar to setting up a proxy for your browser. You tell the client A to connect to service S but use the proxy P as a “hop” in-between. This requires, that A is capable of setting up proxy connections. In Java, you usuallyconfigure the proxy default settings as described here.
There is, however, no guarantee that the plugin actually uses the proxy parameters. It is not uncommon, that a plugin in AEM instantiates its own HTTP client, ignoring the default settings.
Reverse proxy
In case the plugin cannot use a proxy, the next best option is to set up a reverse proxy.
We use the proxy as a “stand-in” for the actual service. The proxy acts as if it was the actual service and routes the traffic to the original service. For that, the proxy setup requires a bit more configuration though:
- Resolve the services IP address, note as I
- Redirect the service’s DNS name to localhost in the /etc/hosts
- Setup the reverse proxy to listen on the services port number O
- Setup the reverse proxy to redirect traffic from O to the IP address I
Redirect traffic
Now we need to redirect the outgoing traffic from client A to our proxy P. We can do that by either
- Configure client A to use proxy P as service instead of service S — this is the preferred solution.
- Locally spoof the DNS name of service S to point to localhost — use this option when the service address is not configurable in A.
Client configuration
Let’s assume A wants to communicate with service S running at some-service.io:443. Let’s also assume, some-service.io resolves to the IP address 172.31.76.38 (as can be seen with ping, nslookup or dig).
Obviously, A sends HTTP packets to that IP address. What’s not so obvious is, that A also sends an HTTP header Host: some-service.io .
Don’t forget to rewrite the the header in the proxy — or else the service will refuse the connection
So we would configure A to use localhost:443 as the service address. This would imply, that A sends Host: localhost as header. But service S will probably refuse requests with that header. To solve that, we can rewrite the header in the proxy.
DNS Spoofing
If the service endpoint is not configurable in the client, we can spoof the service’s IP address to point to the localhost (as last resort):
(1) Resolve the service’s original IP address:
$ ping some-service.io
Pinging some-service.io [172.31.76.38] with 32 bytes of data:
Reply from 172.31.76.38: time=21ms
 …
(2) Note down the IP address. We’ll refer to that address as I.
(3) Add the following line to your local /etc/hosts file:
some-service.io 127.0.0.1This means, when the plugin resolves the domain name some-service.io it is redirected to the localhost. Obviously, this can only be a temporary solution.
Note: You might have to restart AEM to flush the DNS cache and also flush the DNS cache of your OS.
Setting up the reverse proxy
Next, we set up the reverse proxy to listen to port O (e.g. 443) on localhost and redirect the traffic to the noted IP address I on port O (e.g. 172.31.76.38:443).
Decrypting traffic
If you now use the service, you should see the traffic appearing in the proxy. However — the message is still encrypted, the message is unreadable for P.
We can configure the proxy P to decrypt the messages coming from the service S. P would terminate and decrypt the HTTPS connection to S and re-encrypt for A.
If A is set up properly, it recognizes this as a man-in-the-middle attack: Someone else has re-encrypted the traffic but not owning the proper certificate for the domain.
For the sake of better understanding, you can imagine an encrypted message m being put into an envelope and sealed with a seal (S) only S has access to. This encrypted message would be denoted as encrypted(S, m). This “seal” in the digital world is a digital certificate. Only S can use that certificate.
What P can do is, it can decrypt and re-encrypt the message. Metaphorically speaking, P breaks the seal (S) and opens the envelope to get the message m.
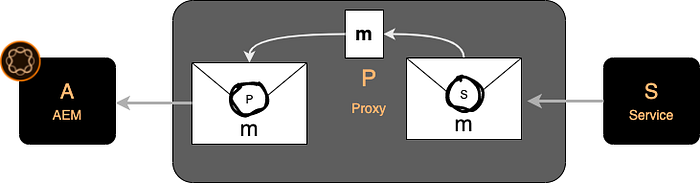
It then puts m into another envelope and signs it with its own certificate (P) and delivers a message encrypted(P, m).
A however contacted S and expects a message encrypted(S, m). Thus, the man in the middle is detected. A will complain and not accept the message.
But that can be fixed. All you need to do is tell A “You can trust messages that are encrypted with (P).
Technically speaking, we need to add P’s certificate to A’s truststore so that A can trust P.
WARNING: This is only a development setup. You should never apply this technique on a production environment! Make also sure to uninstall the proxy’s certificate from your local JVM’s trust store after the debugging session to keep your local machine secure.
Congratulations — you now have a working HTTPS eavesdropping environment.
NOTE 1: IP addresses change — especially when the service is hosted in the cloud. Re-validate the target IP address before each debugging session.
NOTE 2: Don’t forget to remove or comment out the the entry from your /etc/hosts file after the debugging session.
Step by step
Now that we understand the theory, let’s use that procedure with a concrete example.
Client A: As client we use the Adobe Experience Manager AEM (but the technique can be applied to other clients, too)
Proxy P: As proxy we use Charles Proxy
Service S: The service in this example is Adobe Target. But you can apply the same pattern to other services, too.
(1) Let’s find out, where the service endpoint is configured in the client. In our case, it’s in an OSGi configuration. Usually, you would look up the services URL in either the cloud configuration in the repository or in the OSGi configuration:
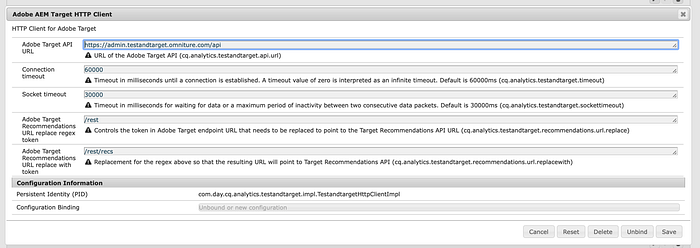
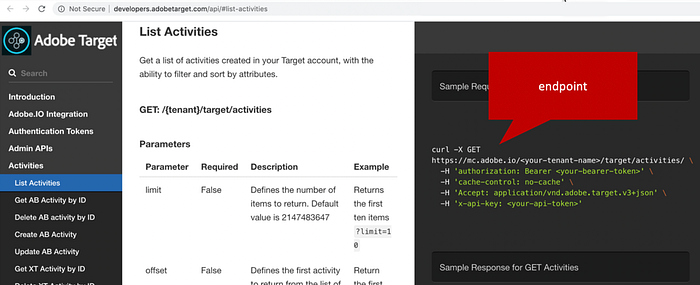
Be prepared for some obstacles. In this special case, the setting was ignored and some hardcoded value was used instead. Luckily, the API is well documented, so we pick up the real endpoint from there:
Unfortunately, the Target integration in AEM does not use the global proxy setting in the AEM configuration. So we need to use the reverse proxy approach:
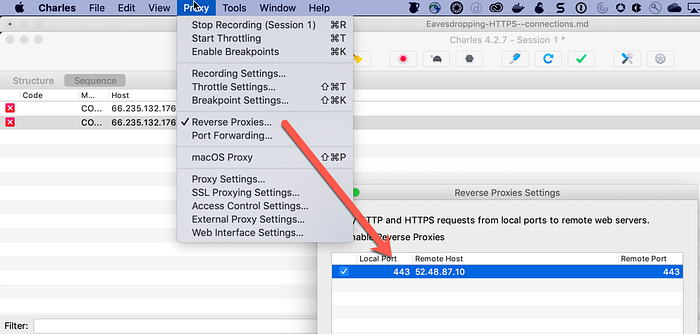
(2) We resolve the hostname to an IP-address by pinging the name:
$ ping mc.adobe.io
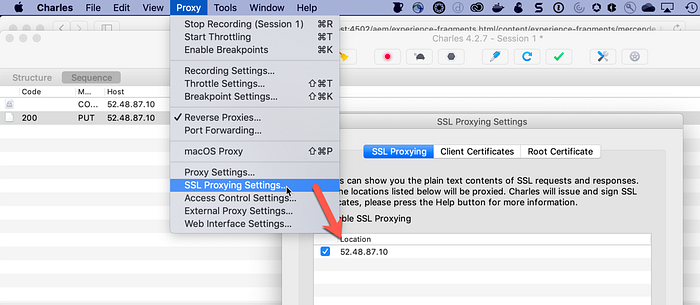
PING mc.adobe.io (52.48.87.10): 56 data bytesWe copy the IP address from the result and create a new “Reverse Proxy” in Charles:
The local port must be 443. The local proxy is going to mimic the remote service.
Make also sure that Charles is actually decrypting the SSL connection for that specific host:
To make the client connect with the local proxy instead of the “real” service, we need to re-route / spoof the services name to the localhost address.
$ cat /etc/hosts
# DEBUG TARGET CLOUD SERVICE
127.0.0.1 mc.adobe.io
Note: Charles also offers an option “DNS Spoofing” — but I couldn’t figure out how to use it in this case.
At this point, Charles will intercept and re-encrypt the transmissions. But as we said before the client very likely will recognize the interception and refuse to work.
So we will import the root certificate of Charles into the Java Virtual Machine to make the JVM accept it. So we download it from the proxy:
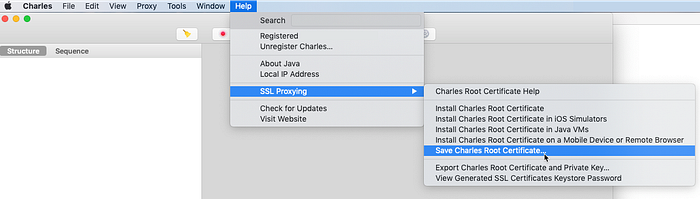
We save the certificate to the desktop as ~/Desktop/charles-ssl-proxying-certificate.pem and import it into the truststore of the JVM. (Remember, the client is running within AEM and the AEM is running in a JVM).
$ cd /Library/Java/JavaVirtualMachines/jdk1.8.0_162.jdk/Contents/Home/jre/lib/security
$ sudo keytool -import -alias charles \
  -file ~/Desktop/charles-ssl-proxying-certificate.pem \
  -keystore cacerts -storepass changeit
Note 1: The location of your virtual machine will probably differ.
Note 2: changeit is the default password of the JVM’s truststore. You probably haven’t changed it on your local development machine — or else you would know.
The command
$ keytool -list -keystore cacerts -alias charles -storepass changeit
charles, Jul 4, 2019, trustedCertEntry,
Certificate fingerprint (SHA1): F2:F5:8C:91:96:F7:65:26:6D:DB:DB:D6:63:F7:BB:50:A6:E9:BF:05
validates the successful import.
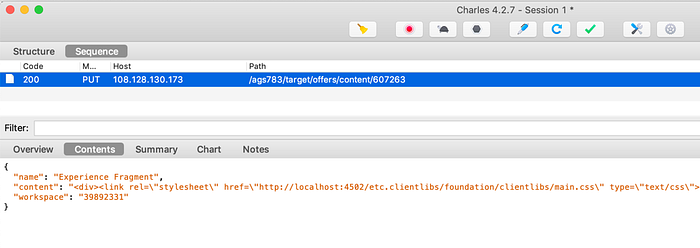
Voila! Now we can eavesdrop into an SSL connection.
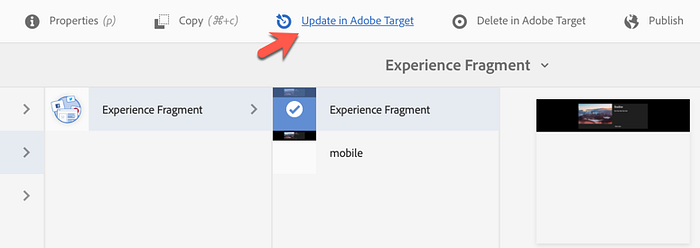
If we click Update experience fragment in AEM, we can see the transmission in plaintext in the proxy:
Conclusion
I use the techniques described here a lot in integration projects and it saved me a ton of time I otherwise would have blindly wasted with trial and error.
If you found this article interesting and helpful, leave me a message and follow me to be updated for similar content.
If you require help in your AEM project, reach out to Adobe Professional Services.
See you soon
-achim